Top Down Center Out with the Coe Trousers

I’ve been following @gocarriesew as she works her way through the Top Down Center Out method with the peppermint wide leg pants. Recently she shared how there are so many decisions one has to make while fitting, each choice creating a different path on the road to a successful garment. It can feel overwhelming, especially in the beginning. Learning how to navigate the decision making process is an essential part of fitting, yet this skill is rarely discussed.

Seeing how other people make fitting decisions is always a learning opportunity for me. So in the spirit of sharing, this post will be a little different than usual; I’ll take you along with me as I fit the tester version of the Coe trousers, and I’ll highlight the decisions that I made and why I made them. If you’re looking for the full review of the pattern, see my previous post on the Coe trousers.

Evaluating the Toile

I used the Top Down Center Out (TDCO) method from Ruth Collins to fit these trousers. It’s the only method that allows me to explore different fitting choices and problem solve with a single toile. If you’re new here, I have a whole slew of videos if you want to learn more, or head to Ruth’s Instagram or her Threads article.

One leg or two?

When I use TDCO, I usually make a one-legged toile because it’s fast, efficient, and the best way to visualize the crotch fit. However, there are some situations when a two-legged toile is called for. I decided to make a two-legged toile for my Coe pattern test so the designer could get the full, bifurcated visual of how the trousers fit.

I also sewed the entire zipper fly on my toile, rather than pinning the fly closed or omitting the fly. Constructing the full zippered closure in the toile gives a smoother center front and a more accurate fit through the torso.

Fabric choice for the toile

I’m using cotton muslin (aka calico) in these fitting sessions. Every time I use this fabric to fit a trouser toile, I’m reminded of what a poor substrate it is for fitting, second only to tissue paper (sorry not sorry, Palmer and Pletsch).

Fabric choice affects fit, so the best fabric for the toile is one that’s closest to my final garment fabric in weight and drape. Cotton muslin is too lightweight for making trousers, with little drape or give. It shows every little wrinkle and fold, whereas most bottom weight fabrics won’t. It’s possible to spend days or weeks chasing down perceived fit issues in cotton muslin that completely disappear in a different fabric. Unfortunately, muslin was all I had on hand, so I had to make it work.

Fitting the waistband

My measurements are 32″ waist and 42″ hip, which put me in a straight size 12 for this pattern. I made the waistband to check the fit, and happily I needed no modifications (a first!). The waistband has a little less than an inch (2.5cm) of positive ease, which makes for a very comfortable fit.

Fitting the toile: Top down

Next, I tried on the toile. The Coe trouser instructions tell us that the intended vertical ease between the crotch or “saddle” of the trousers and the body should be 1/2 inch. I’m 4 inches taller than the pattern is designed for, so I knew I would need to add length to the rise.

It’s not recommended to start fitting with the toile pinned to the waistband as drafted, but for the sake of comparison, here is what the toile looks like with no adjustments in the rise:

Coe front view, no adjustments
Coe back view, no adjustments
Coe side view, no adjustments

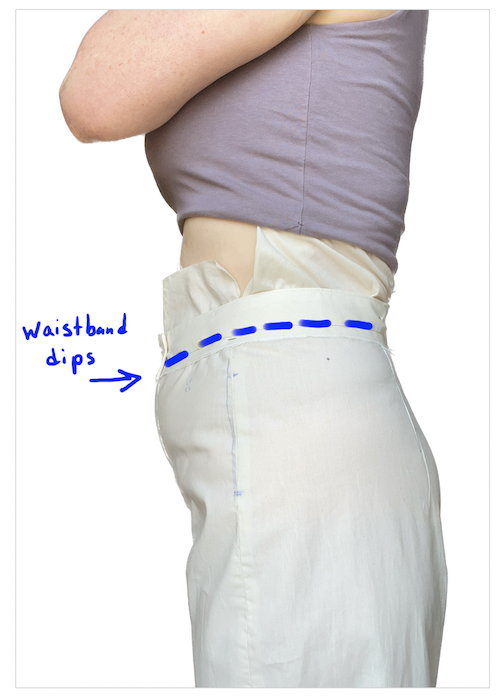
While the front view looks fine, the crotch seam is uncomfortably tight against my body, and the waistband is pitched forward. In the back, I’ve got a bad case of “hungry bum”.

Using TDCO, I lengthened the vertical rise evenly all the way around the toile until I hit the intended half inch sweet spot for crotch ease. Then I added a little extra length just in the front rise to get the waistband to be more level.

Front view with 1″ additional rise
Back view with 1/2″ additional rise

In the photo above, I’ve added 1 inch in vertical length to the front rise and 1/2 inch to the back rise, and I’m happy with the results. Yes, I have a small fold of fabric that’s pointing to my knee on the right side of the back view. I often see this when I’m using cotton muslin to toile, and it’s probably due to body asymmetry. I did no additional adjustments to get rid of it, and it disappeared in my final garments.

So the length adjustment alone is enough to get me to a good fit, especially in the back:

BEFORE: “Hungry bum” effect with no rise adjustment
AFTER: smooth sailing with 1/2″ additional rise length

Fitting the toile: Center Out

Next, TDCO directs us to work from the center out. Often, I need to adjust how the leg hangs on my body by moving the side seam up or down at the waistline. I use the hem as my visual cue for whether the leg hangs straight; in this case the toile didn’t need any adjusting here.

Then I assessed the circumference of the toile. I had already established that the waistband circumference felt great, so I worked my way down the body. The hip circumference on the size 12 gives me about 2.5 inches of ease. It’s close-fitting without being restrictive to walking or sitting. The thigh and leg ease is also quite generous, so no changes are needed.

Generous ease from thigh down
Snug fit through high hip

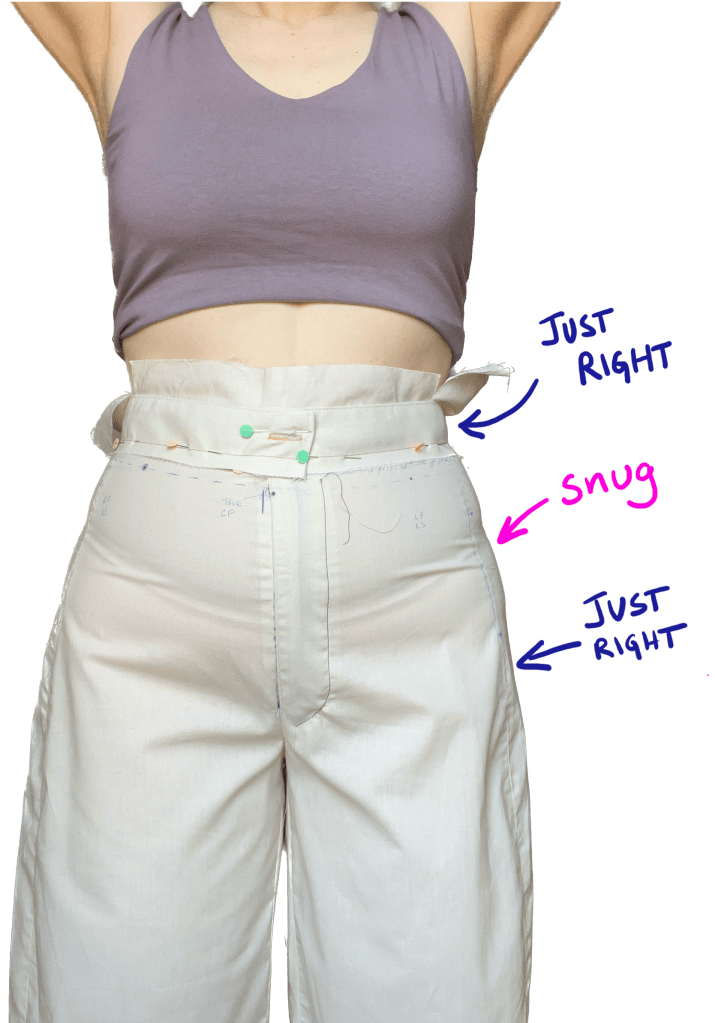
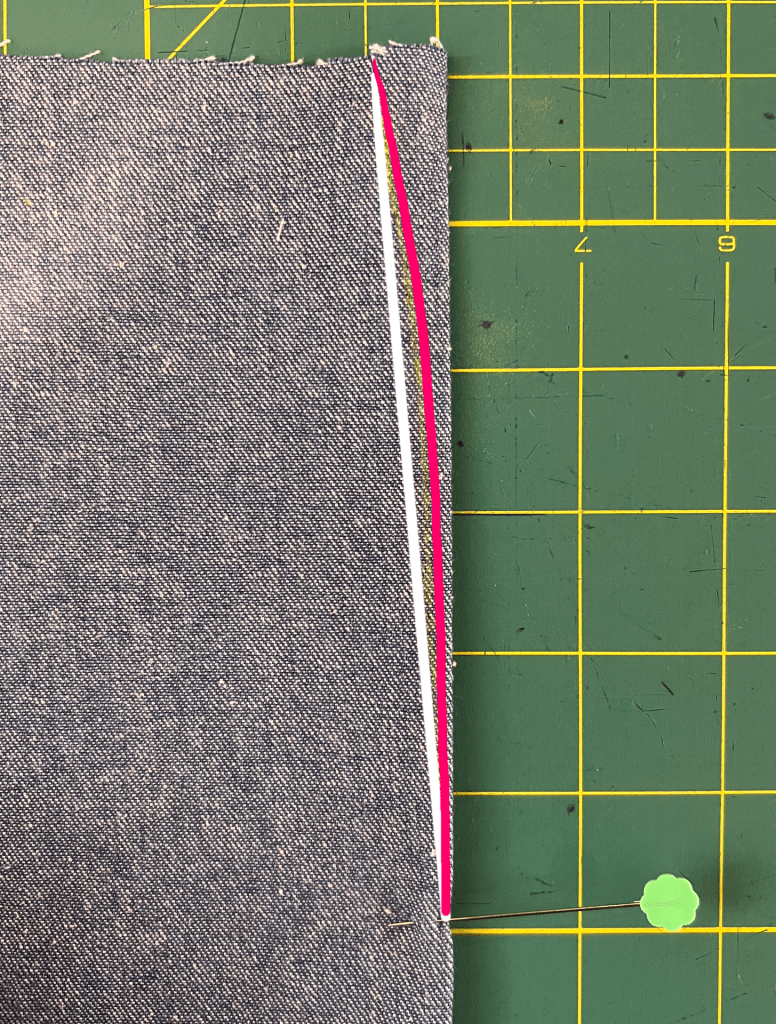
The high hip (in pink, above right) is the only place that felt quite snug. The muslin is tight over my abdomen, and I have zero or even a little negative ease here. You can also see the fabric is straining with some horizontal wrinkles.

I omitted the pockets on this toile for simplicity, but if I had included them, they would be right where the trousers are tightest. That’s an invitation for a gaping pocket. Some folks don’t mind a little gapping–it’s a judgement call for each maker whether this is bothersome, but I’d prefer a little more ease and a flatter pocket.

So to address the high hip circumference and pockets, I have a number of options for how to proceed.

Option 1: Let out the side seam

Typically with TDCO, if the circumference of the toile needs adjusting, we let out the side seam using the extra fabric in the seam allowance. So I could add fabric to the front and/or back pieces to add ease and then blend down the hip.

As an experiment, I seam ripped a few inches of the side seams on my toile to see what it would look like.

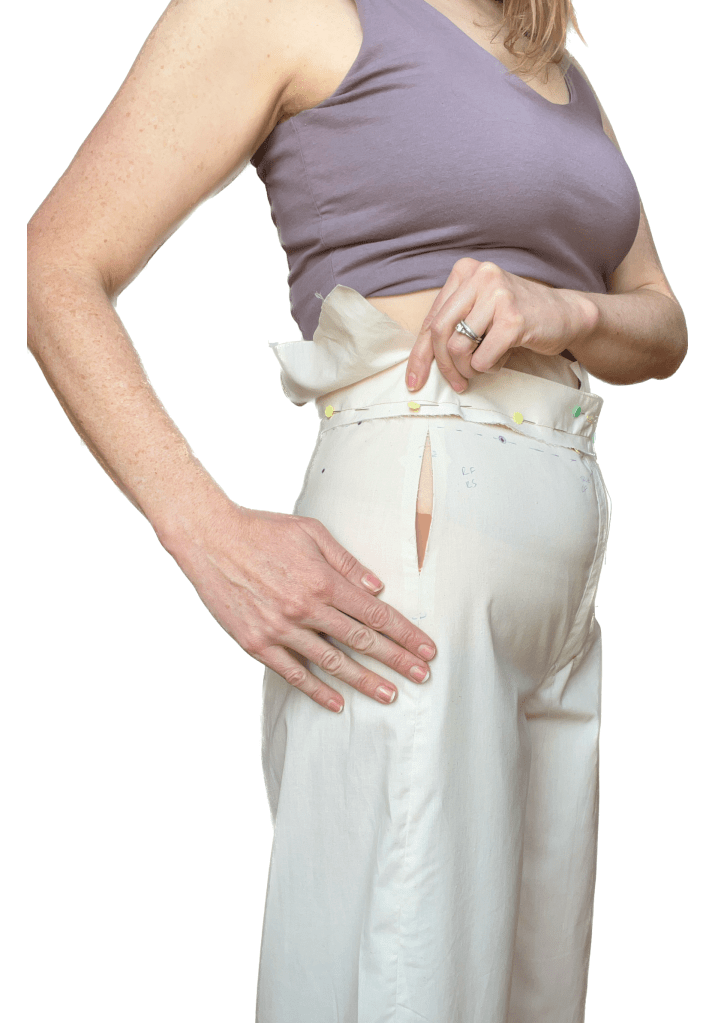
The seam naturally wanted to splay open about a half inch per side (1 inch in total circumference). My first impulse was to add about 1/4″ to the seam allowance on the front and back side seam at high hip, like this:

Front and back pieces of Coe, red fill indicates extra fabric for high hip ease

But wait! This modification would have some important consequences due to Coe’s pocket design. Making the seam more curved at high hip would mean making the pocket opening more curved, as well. The resulting front piece looks a little strange (below); that curved pocket opening might act like a flap and stand away from the body, rather than lie flat. Not ideal.

Altered front piece with a pocket “flap”

The better option here would be to size up in the hip, blending the extra fabric needed at high hip with a larger circumference in the true hip.

Front and back, red fill indicates added fabric for ease

But the trade-off here is that I would add more ease at the hip and thigh for an overall looser fit through the torso. Sometimes this can be a great strategy when fitting, but I wanted to see if there was another solution that preserved the original hip and thigh circumference of the size 12.

Option 2: Curve the back dart

To give myself extra room at the high hip level, an alternative would be to leave the side seam and pocket opening alone and look to the back piece instead. The back dart is an attractive option, since it’s ideally positioned around high hip level.

I could curve the back dart (below, pink), reducing the dart intake at the high hip level but maintaining the same intake at the waist. This approach could give me back a quarter inch on each side of the dart, which translates to an additional inch of fabric across the entire back piece right around high hip level.

Typical dart stitching line shown in white, curved dart stitching line in pink

Option 3: Alternative construction techniques

Construction techniques affect fit, and there are a variety of methods to stabilize a gaping pocket.

Pockets gape because the cut edge is slightly on bias, and because they are required to curve around the body and stretch out as we move. One solution is to fuse the wrong side of both the outer and inner edges of the pocket opening with interfacing, or use a strip of twill tape or a piece of selvedge sewn along the inside of the pocket opening. The pocket opening can also be cut 2-3mm shorter than the piece it lays on top of, sort of like negative ease for your pocket opening.

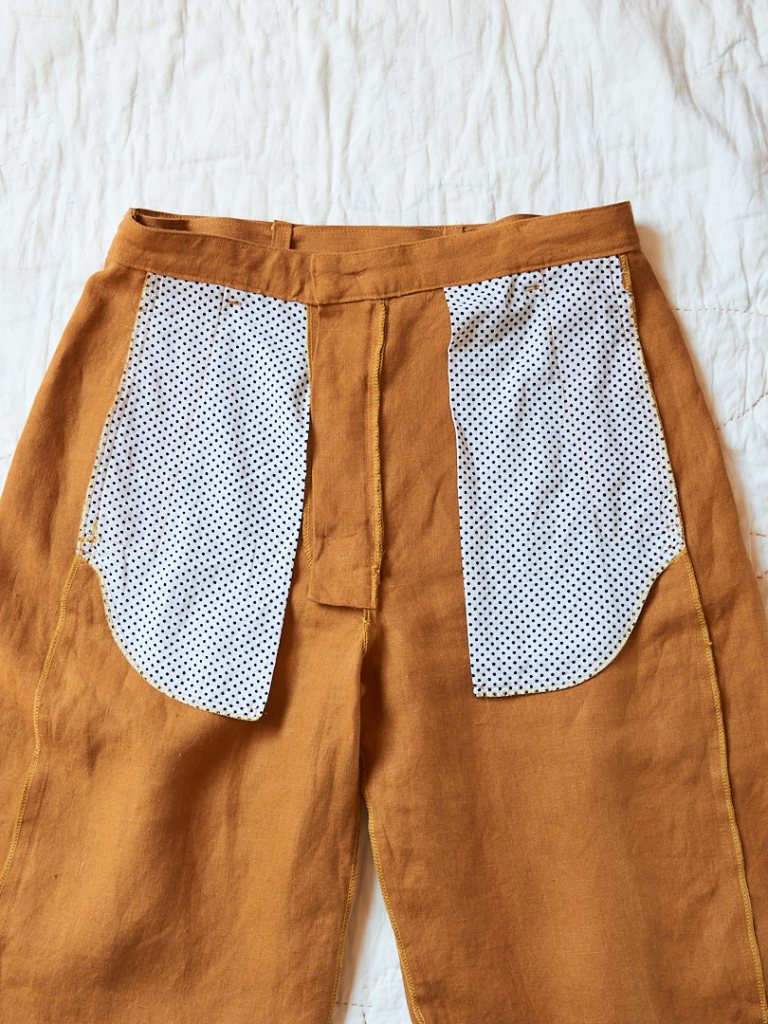
A pocket stay is another common solution found in many trousers with on-seam pockets, and there are a variety of ways to construct a stay (for example, here and here). In some cases, a short length of petersham/grosgrain ribbon is used to secure the pockets to the center front seams (as illustrated below), or the entire pocket can be extended to create the stay.

An optional pocket stay was added to the Coe instructions after testing

While a pocket stay wouldn’t give me any more room at high hip, it would help to control the front pocket from gaping open and give me a more “secure” feel to the front of the trousers. I bookmarked this idea as I continued to mull over other potential solutions.

Option 4: Fabric choice.

Like construction techniques, fabric choice also affects the fit. As I mentioned above, the cotton muslin (aka calico) that I used for the toile has very little give or drape. Low or negative ease around the abdomen can be intentional in a close-fitting design, and it’s likely that my final fabric would relax and loosen after a few wears, especially if I chose my fabric wisely. A linen or a cotton twill will usually grow as it breaks in, so the easiest solution could be to switch fabrics.

Coe Trousers, Version 1: Linen

I opted for the fewest number of adjustments possible for my first pair of Coe trousers. So I made length adjustments only, adding 1 inch to the front rise, 1/2 inch to the back rise, and 2 inches to the leg. I deliberately chose a 6 oz linen to test Option #5: would switching fabrics resolve my fit issue?

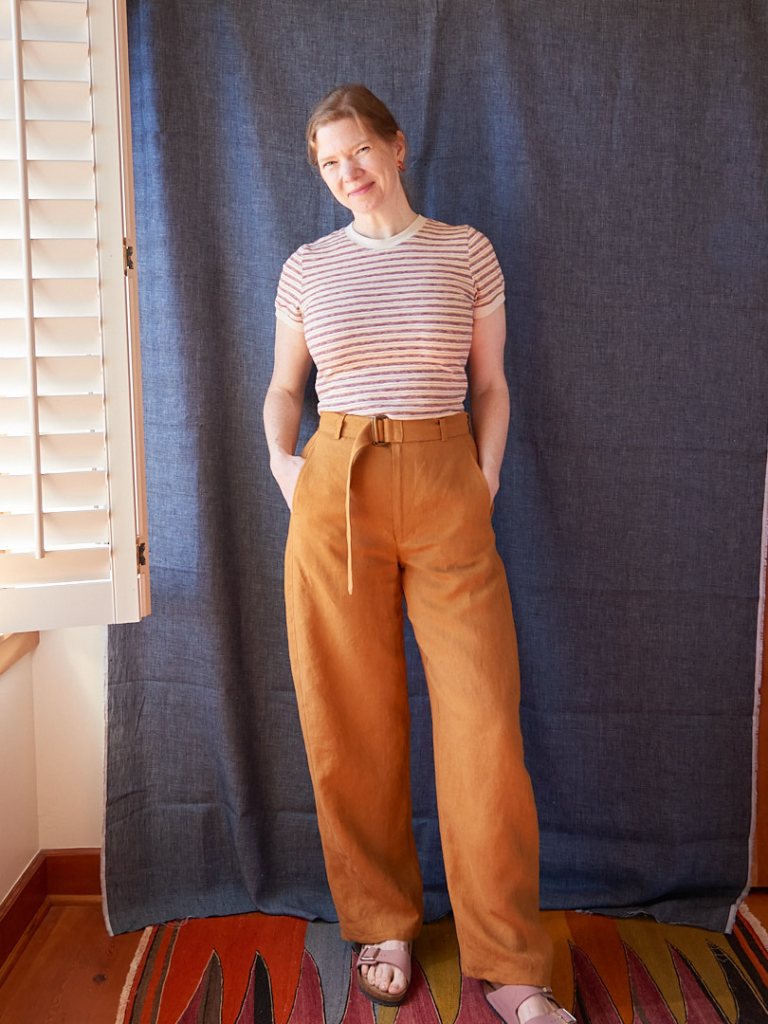
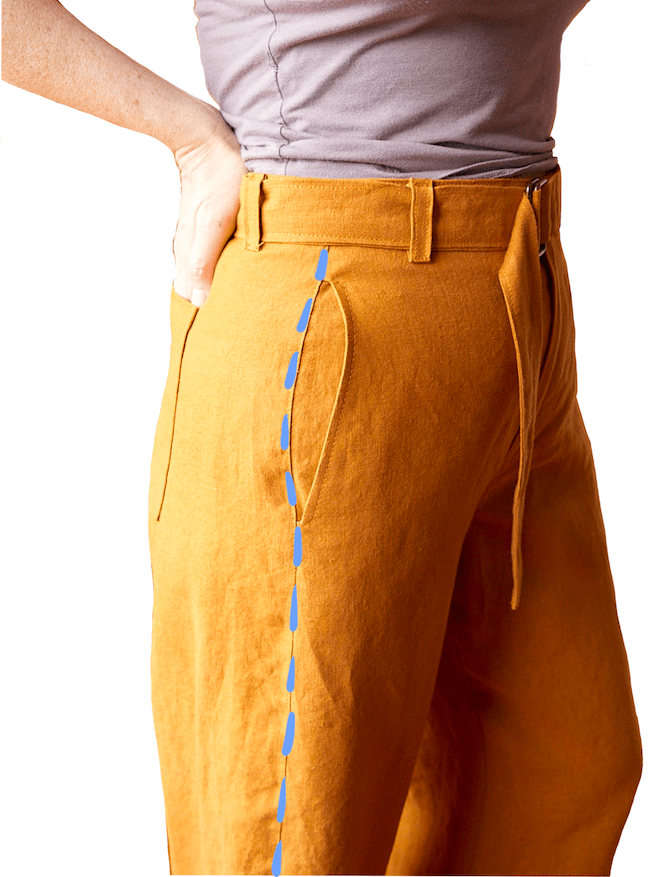
If you read my previous post, you’ll know that these linen trousers turned out well. They are comfortable and very wearable. The high hip is no longer tight like it was in the toile, so the linen has grown a bit as anticipated.

However, the front pockets gape a little and the side seam is pulling toward the back slightly on my right side (hello again, body asymmetry). So I wanted to try a different solution.

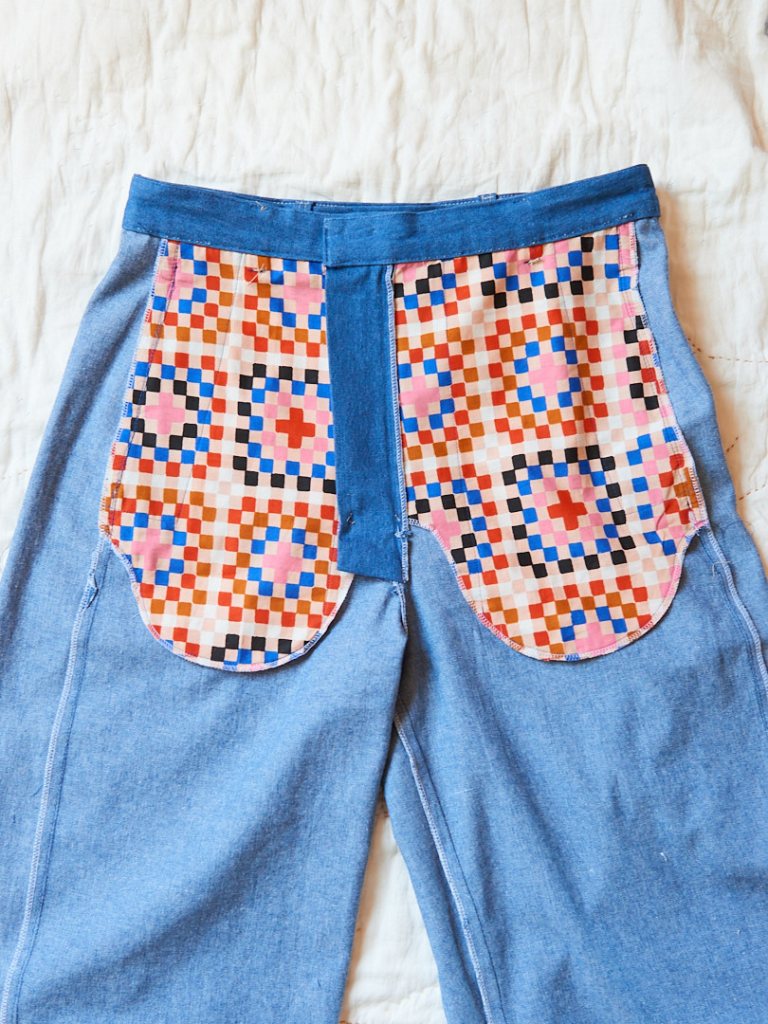
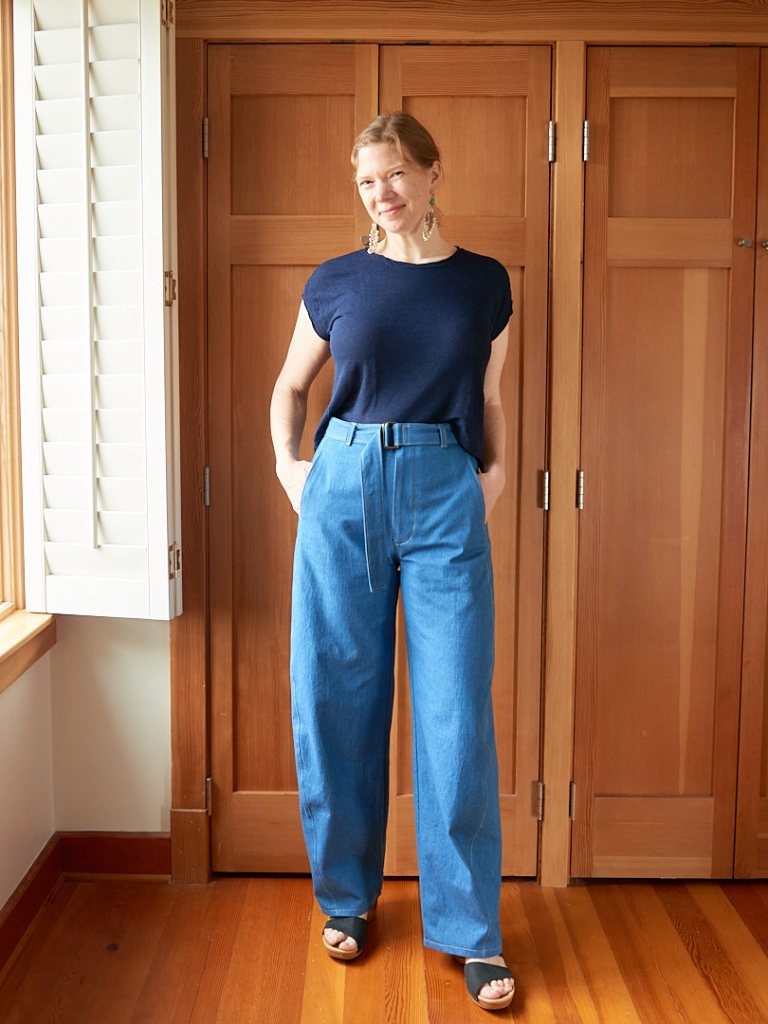
Coe Trousers, Version 2: denim

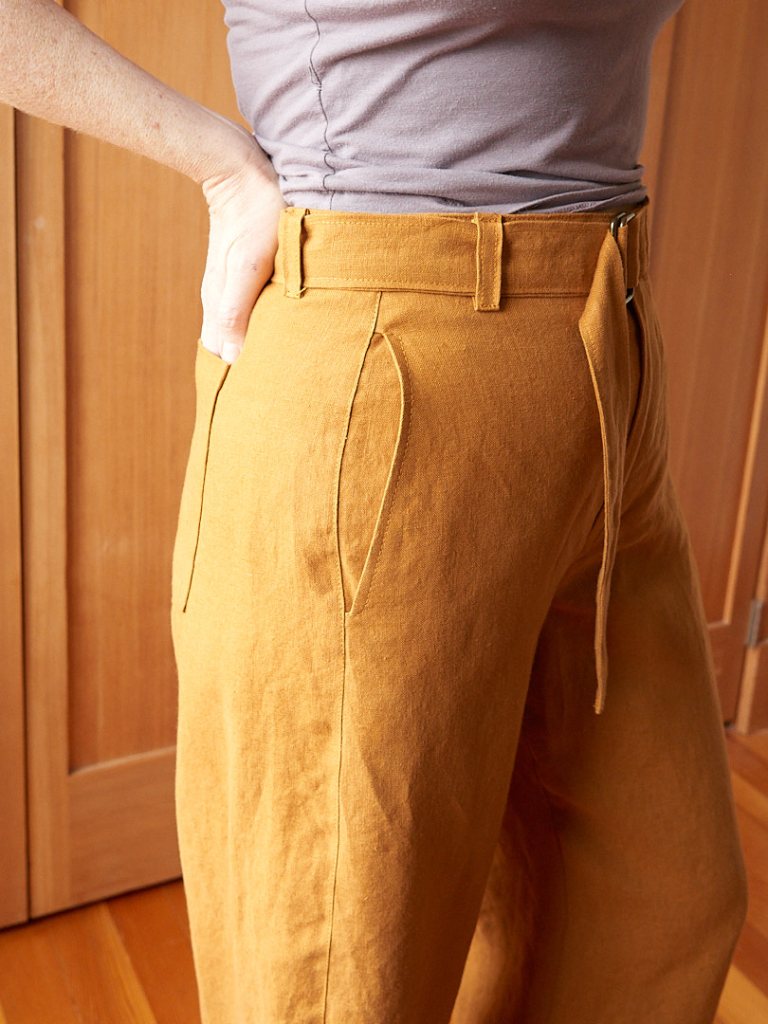
For my second pair, I switched fabrics to an 8oz cotton denim. Twill fabric will also relax and grow with wear like the linen, but I wanted to try some additional tweaks to resolve the pocket gaping.

For this pair, I chose a combination of Option 2 and Option 3. I curved the back darts to add ease at high hip and added a pocket stay. I think the results speak for themselves:

Final thoughts

All in all, my final edits to the flat pattern were minimal, thanks to Daughter Judy’s drafting and TDCO:

Final fit adjustments with TDCO

Decision making while fitting can feel overwhelming at times. Between pattern adjustments, construction, and fabric choice, there is a lot to consider. I don’t usually know what changes that I’ll need when I start out with a new project. That uncertainty can feel uncomfortable.

With practice and patience, I’ve been able to develop more of an intuition for what to try and a higher tolerance for the uncomfortable stage in the middle of the fitting process. I’ve also learned to trust that the TDCO workflow will get me to a successful fit even if I can’t always see exactly where it’s leading me at first.

Of course, I’m still learning as I go, too–that’s the fun part! I’ve got a few more TDCO fitting deep dives coming up, so stay tuned if this post was helpful.

28 responses to “Top Down Center Out with the Coe Trousers”

  1. Thank you so very much for this generous post, laying out your decision making all the way through the fitting, and the pros and cons of each possibility.

    I used your videos to fit a calico muslin for the Morgan jeans on the weekend- wondering now whether I left enough ease, and whether my fitting frustration was largely due to the calico fabric. We’ll see when I make the jeans.

    Thank you again very much, Kate 🐨

    Like

    1. Depending on the denim you’re using, your Morgans will likely relax a bit more than the calico, so it might be just right!

      Like

  2. Stacey, that curved dart is genius! I have hip dip and wonder if this could help solve my pocket issue but by curving the other way.
    Thank you so much for these deep dives I learn so much and am always so inspired by your makes. The fit, the fabric choice always so on point.
    Frith

    Liked by 1 person

    1. Ooh yes! Curved darts can work both ways, depending on whether you want to add or remove fabric (I often curve bust darts, too). Hope it works well for you!

      Like

  3. Stacey! Your posts are a treasure trove of valuable observations and analysis. Thank you! I am anticipating the negative ease over my abdomen to be an issue, even though I fall into a straight 12 these days. You’ve given me a lot to think about as I toile. I was thinking I’d have to size up….. but the dart release is genius (with my body I may even eliminate the dart) letting the back pant do the job of providing that extra ease. Fun times ahead with Coe!!

    Liked by 1 person

    1. Glad it’s helpful! I always used to overlook back darts (and waistbands) until I started using TDCO, now I understand what useful tools they can be when fitting. Enjoy your future Coe trousers! 😊

      Like

  4. Thank you for the comprehensive analysis of fitting these trousers. So, so useful to read your thought processes and the documentation is much appreciated by those of us following along, trying to emulate your success!

    Liked by 1 person

  5. Thank you so much for your detailed posts! I’m always learning something new; like the pocket stays.

    I made the Mitchell Trousers using the TDCO method with good success except for the pocket opening gaping a bit. The stays will be V.2.

    Like

    1. Pocket stays are my friend. 😊 I just added stays to the Open Studio Shop pants and it really helped the angular pockets to lay flat. When in doubt, add a pocket stay!

      Like

  6. Thank you for this analysis! This deeper dive into a pattern I’ve actually toiled is super helpful.
    It does lead me to two questions.

    1. When you add to the rise, do you add it by cutting the upper portion of the pattern at the indicated line and adding paper to lenghten it, or do you add it to the top like you show in your drawing?

    2. When I ‘released’ the front pant from my WB, because of the exact same tension you described at the upper hip, which in turn causes the front of the pant to ‘angle’ down, the crotch became tight. Would you then also extend the crotch lenght to alleviate that tension so the thighs get more room to move?

    Forgive me If you’ve answered these questions previously.

    Like

    1. Good questions.
      1. I’ve done both ways. Both work equally well, if you add length by using the lengthen/shorten line, then that can save you the trouble of transferring notches and other pattern markings along the waistline but sometimes this is unavoidable. For the Coe, I actually did both. I used the lengthen/shorten line to lengthen the rise equally 1/2″ on front and back pieces (this saved me from transferring waistline notches and pocket markings on the back piece). Then for the additional 1/2″ that I added to the front, I just added it to the top of the front piece, tapering to nothing at the sides.

      2. I think you are asking about adding to the cross-body (front to back) distance in the crotch, rather than adding more vertical length to the rise, correct? If you find that you want more room in the thigh, yes, absolutely you can size up to a larger crotch hook and inseam in the front pattern piece, which should give you a longer crotch extension and more room in the thigh. This is one aspect of TDCO that I haven’t talked about much, but sometimes we will need to adjust the amount of cross-body depth in a pattern, and sizing up in the crotch/inseam is what TDCO recommends — either in one or both front and back pattern pieces. Let me know if that doesn’t address your question!

      Like

  7. Love this in depth description of using TDCO method on a specific pattern. I really liked the pattern so bought it and am now following along with my own pair! It’s been a great introduction to sewing pants and has made it much less intimidating.

    I’m having a really hard time sourcing the rectangle buckles. Hoping for an antique brass like the ones you use. The notions list says 1.75” rectangle rings, and my calculations suggest that that is the inside measure of the ring as well as the finish height of the belt. Can you share where you sourced your rings?

    Liked by 1 person

    1. The welded rectangle rings were surprisingly hard to find! I used Goldstartool.com. I’ll paste a link below, but in case WordPress doesn’t let you click into it, you can search their site for “welded rectangle rings” and you should see a few options. I bought the 1 3/4″ rectangles.

      https://www.goldstartool.com/welded-metal-ring-square-ring.htm

      Like

      1. If I may suggest an idea for a post…. I’d like to know about your choices of “notions.” Do you use a metal zipper? What weight of interfacing do you use for a waistband? How do you choose a button? (I’m thinking of the Adams pant). What fabric do you use for a pocket lining (cotton but slippery enough for lining). You have a terrific website.

        Like

      2. Hello! glad you are enjoying the blog. TO answer your questions:
        – I use a metal zipper for pants as a general rule. Usually I use a #4.5 YKK brass pant zipper. I source mine from Wawak usually, but you can find them from most places that sell sewing notions.

        – My interfacing is just a standard medium weight woven interfacing, nothing fancy. In general, I try to match the weight of my interfacing to the weight of the fabric.

        – Buttons are entirely up to you! For my Coe Trousers I just used what I had in my stash. For the Adams you could get fancy and do a metal jeans button to get a workwear vibe.

        – I usually use cotton for my pocket lining in pants, generally a quilting cotton or something similar in weight. If I’m using a delicate fabric, then I will use a more delicate and lighter weight cotton, but I typically work with 7oz – 14oz fabrics for pants, so a quilting cotton or similar works just fine for me. You can also buy cotton twill “pocketing” fabric from various places online that is more authentic to the types of pocketing you will find in retail. But I usually just use whatever I have on hand.

        Like

      3. Thanks! I didn’t expect a personal reply. I had these questions because your garments always look so professionally made and I suspected this was partly the result of good “hardware.”

        Based on your review, I’m going to sew the Adam pant. Can you tell me what you did with the interfacing? The instructions say:

        INTERFACING TIPS – Interfacing can give a belting effect in waistbands making the piece more secure but have less give. If you want less of a belting effect try fusing only the front or back section or omit entirely. – If omiting apply small squares behind button and buttonhole positions. – Try building structure by layering light weight interfacing.

        I am afraid that the curved waistband will stretch all out of shape if there isn’t some hefty interfacing support in it. I know that this is partly determined by the weight of the pants fabric but recently read that RTW uses med weight interfacing on ALL pieces of the waistband (outside and facing). I’ll test my waistband (TDCO) but knowing what you do might save me some steps.

        Thanks again Julie

        >

        Like

      4. Hi Julie, I usually interface at least one side of my waistband (usually the outer side that isn’t touching the body), but it depends. For a pair of really snug jeans, I will sometimes skip the interfacing entirely if I *want* the waistband to be soft and a little more forgiving. For my Adams pants, I believe I interfaced the outer side of the waistband, front and back. However, I used a fairly heavyweight denim (12-14 oz) for both pairs of Adams pants which is inherently going to be more stable than a lighter weight fabric. If using a lighter weight fabric, I might be tempted to interface both sides.

        So, the choice to interface the waistband depends on your fabric and your personal preferences for fit. If you like a firm waistband that won’t stretch out at all, then I’d go for a heavier interfacing on both sides of the waistband pieces.

        Like

      5. Thank you. There’s something really touching about chatting with a fellow sewing/fitting enthusiast.

        >

        Like

  8. Thanks for all your wisdom! I just bought the pattern and will definitely be referring back to this post.

    Liked by 1 person

  9. So helpful to follow your thinking as you problem-solve. I so appreciate your post!

    Liked by 1 person

    1. Glad it’s helpful! I hope to do a more of these types of posts in the future. 😊

      Like

  10. I’m sewing the Coe as my first pair of trousers and this is so helpful! I’ve watched your TDCO series and have a question about the preparing the pattern step for the Coe Trousers. My hip size puts me at a 12. I want to add between .5 and 1″ at the side seam per the TDCO method. You mention to use the bigger sizes on the pattern itself for tracing out the additional seam allowance, but on the Coe, the distance between sizes tapers towards the hem. For instance, the distance between sizes 12 and 16 go from about 3/4″ at the hip to about 1/4″ at the hem. Should I trace and cut size 16 anyways? Or add 3/4″ consistently to the hem, deviating from the size 16 line? Thanks!

    Like

    1. Adding a consistent amount all the way down the leg will give you the most flexibility when fitting. It’s not a guarantee that you’ll need to change the ease around the ankle or hem (I rarely do), but it’s nice to give yourself a little extra there just in case. So that’s what I’d recommend.

      Like

  11. Hi Stacey, thank you so much.
    I’m learning a lot, what you do is very helpful.

    I still can’t bring myself to create my own pants. Which pants would you recommend to start? Ideal without side pockets because to be the first, I feel that the difficulty increases a lot for my beginner level. I’ve never made pants!

    A hug, greetings from Chile.

    Like

    1. Hi Lisa, congrats on feeling ready to make pants! What an exciting milestone. I can’t think of too many pants patterns without side pockets. The Merchant and Mills Eve trousers and Anna Allen Pomona pants come to mind, but neither of those patterns is great for a first time (the Eve instructions for the side zipper are intermediate, the Pomona pants have no side seam and thus are more challenging to fit). But here is my advice for folks who want to start making their own pants:

      -Pick a design that you are excited to wear. This is probably obvious to most folks, but the best pattern to start with is the one that you are the most motivated to make and wear. Patterns I usually recommend for TDCO beginners are The Assembly Line high waisted trousers, Peppermint magazine wide leg pants, and Daugher Judy Adams pants. But those are by no means the only great patterns out there.

      -Making pants requires a few different skill sets — fitting is just one part of the puzzle. Construction techniques and fabric choice are two others. So I always recommend practicing the construction of the trickier parts like pockets or zippers using scrap fabric before you get to your final garment. It’s also totally reasonable to focus just on construction techniques first and leave the fitting for your second (or third, fourth, or fiftieth) pair of pants.

      – Look for a pattern that has a sew along if you’d like a little extra instruction. Youtube is a great resource for videos on how to construct various elements of pants designs, so if I hit a tricky part during construction, usually someone on YouTube has a video that will help me out.

      – Finally, have fun and celebrate your learning successes! My first pair of pants was far from perfect, but it was a big achievement for me and signaled that I was leveling up my skillset. Make sure you celebrate that victory!

      Like

  12. Thanks so much for this. Really appreciate your time and effort.

    Liked by 1 person

  13. I was lying in bed ruminating on my first Coe toile – and it occurred to me that your fit notes would be helpful! I like the point about respecting the unique drafting of the side seams and using other shaping elements to get desired fit. I graded from waist to hip on my first version and it’s sitting funky at the high hip. I think for the next one I will try the curved darts, pocket stays, and a sturdier fabric. Thank you for sharing!

    Like

    1. Glad my notes are helpful! Good luck on your next toile! 😊

      Like

Leave a reply to katejalcorn Cancel reply