Top Down Center Out with the Eve Trousers

When I first encountered the Top Down Center Out pants fitting method, I didn’t understand it. Why so much emphasis on the waistband? How am I going to get pants to fit if I can’t redraft the inseam, crotch curve, or leg angle? What about the balance? I’m used to slashing, spreading, and redrafting every pants pattern to fit me, and this method didn’t seem like it was going to be enough. Friends, I was wrong.

Top Down Center Out cracked my understanding of pants fitting wide open. It is an inclusive, body-neutral approach that works by fitting the pattern directly to the 3D landscape of your body, rather than identifying problematic body parts and adjusting for them. The method is based on the extensive scholarship and experimentation of Ruth Collins (@ithacamaven), and it offers a set of practical guidelines for how to choose your size, manipulate the toile to fit, and transfer the changes back to the flat pattern. 

Fitting with Top Down Center Out

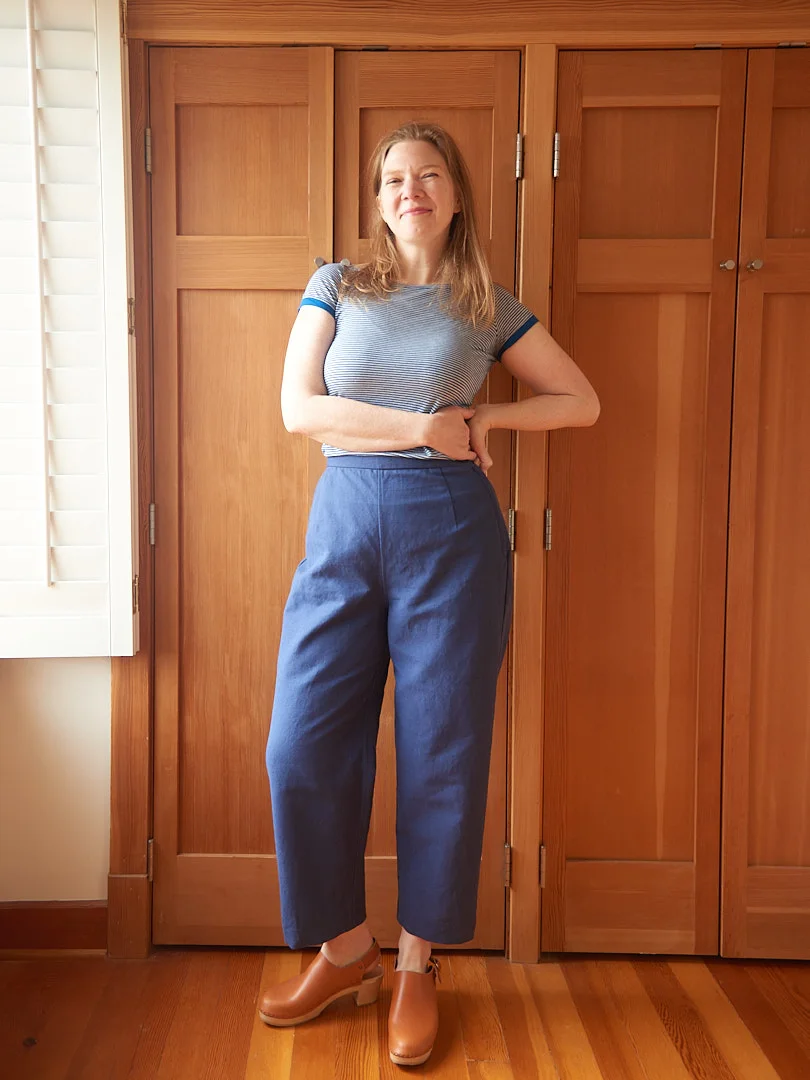
I picked the Eve trousers by Merchant and Mills for my first foray into Top Down Center Out. Eve is a relaxed fit trouser with a high waist, cropped hem, and no side seam pockets. This pattern is available in two size ranges, up to a 122.5cm/48.2 inch hip and a 145.5cm/57.5 inch hip (note: the higher size range has an elastic back waist whereas the lower size range does not.) 

For this post, I’m focusing on what I learned by using the method and how it changed the way I think about fitting pants. The complete, stepwise instructions for Top Down Center Out are in the summer 2022 Threads issue (“The #TopDownCenterOut method for successful pants fitting“). Ruth’s Instagram is also a good source of information if you are new to the method. Additionally, I’ve saved a detailed walk-through of how I used Top Down Center Out to choose a size, prepare a trouser pattern, and fit a toile in my Instagram highlights (3 part highlight series called “TopDownCenterOut”). 

The first phase of Top Down Center Out is to fit the waistband by itself. It’s easy to underestimate the importance of this step, I certainly did. According to the Eve size chart, my waist measurement is between a size 10 and 12, but my customized waistband ended up between a size 12 and 14 because apparently I like a little more ease. If I had treated the waistband as an afterthought like I usually do, I would have made the waistband one size too small on the finished garment. This was the first major win for Top Down Center Out: a bespoke waistband that was guaranteed to be comfortable and stable.

Things really got interesting after constructing the toile. My one-legged Eve toile looked decent, and I had about ½ inch of vertical ease in the crotch seam with about 3 inches of ease at the hip, which seemed very wearable. But it also had the typical fit issues that I always see with pants: the grainline skewed inward and I had long drag lines in the back from the crotch to the knee. 

Normally, I would try a combination of adjustments to try and eliminate these issues: a back crotch hook extension, a full thigh adjustment, a knock knee adjustment. If I really got desperate I might resort to scooping the back crotch curve. The resulting pattern piece would be significantly different from the original. 

But with Top Down Center Out, all of those tools are off the table.  I could only adjust the fabric at the top and the sides of the pants. How could I ever make these pants fit? I didn’t think this experiment was going to work. 

Thankfully, Top Down Center Out gives you a structure for how to go about adjusting your toile, what to focus on, and in what order. You also can unpin and repin if your first adjustments don’t work, so you can iterate much faster because you don’t need to cut an entirely new toile each time.  After initially trying several large adjustments (1 inch increase in rise, for example), I discovered that to correct the issues I was seeing, I only needed a 3/8 inch increase in the front and back rise, tapering to nothing at the side seam (I also took in the side seam and lengthened the leg by 3 inches).

This seemingly inconsequential adjustment to the rise straightened the grainline and resolved the drag lines in back. And yet I’d only changed the pattern by mere fractions of an inch from the original draft.  How was this possible?

My theory for why this adjustment worked has to do with intended ease. The pattern was drafted with an assumption about how much ease there would be in the crotch seam. On my body, the trousers have less crotch ease than this intended amount, even though the crotch didn’t feel tight at all. By adding 3/8 inch to the rise front and back, I’m lengthening the crotch seam by a total of ¾ inch, and lowering the “saddle” of the pants, where the crotch hooks meet. Since I’m not adding length to the outseam, this adjustment also effectively lowers the inseam relative to the rest of the pants. And that pivots the leg, rotating it to correct the grainline. 

This example is proof that I’ve been dramatically underestimating the importance of the waistband and its role in fitting pants. Changes to the pattern around the waistband can affect the entire garment, which makes sense given that every major seam hangs from the waist. Even small changes at the top can have dramatic effects at the bottom.

Would my usual adjustments to the crotch hook, thigh, and leg angle have worked just as well as Top Down Center Out? Maybe, and I may do that experiment in the future. Top Down Center Out is not about replacing the traditional fitting methods (especially if they are already working well for you!), but more about providing an alternative for anyone who is frustrated by them. In my hands, the method was a more direct path to a well-fitting pair of trousers. And, in taking that path, I avoided reinforcing the idea that my body parts are problems to be solved. I wasn’t really focusing on my knees or my thighs, I was just making a pair of trousers that looked great. 

What is fit? 

All of this left me asking one big question, one that Ruth had posed to me rhetorically in my DMs as I was trying to wrap my head around what I had just done: What is fit? How do we define a “good fit” for a pair of trousers? Why do we define it that way?

For me, a good fit has always been: 1) comfort/ease of movement, and 2) absence of drag lines. The emphasis is usually on the former, but if I’m honest, sometimes the latter has equal weight thanks to the many popular pants fitting guides that tell us we must eliminate wrinkles to be successful. Top Down Center Out argues for alternative criteria instead of evaluating drag lines: preserving design intent. 

I didn’t understand this concept when I first started reading about it on Ruth’s IG. Design intent refers to the pattern designer’s overall vision for how the pants fit on the body. It’s the distribution and amount of ease and the precise way that the pattern pieces are drafted to come together around our curves.  Top Down Center Out advocates that respecting the design intent of a pattern is fundamental to the fitting process. 

I’ve been ignoring design intent because it didn’t seem relevant to me; it is impossible to preserve design intent if I’m using a body-part-centered approach to fitting. If I want the pants to fit, then I must fundamentally change the pattern because those are the only tools I’ve had up until now. It’s the classic “give me a hammer and everything looks like a nail” example. I’m so used to chopping up my patterns to correct for a flat seat or knock knees, that it seems preposterous that anything else could work. But Top Down Center Out opened another door. By preserving the intended amount of ease in the Eve trousers rather than redrafting them, I was able to achieve a great fit with not only minimal adjustments, but also minimal effort.

And here is where things fundamentally shifted for me.  I remembered the 1998 short story, “Story of your Life” by Ted Chiang (the basis for the 2016 movie, “Arrival”). I won’t spoil the story if you haven’t read it, but it has to do with the idea that the language you speak shapes the way you think and how you experience the world. Top Down Center Out feels like speaking an entirely new language for fitting. It redefines how to evaluate good fit. After practicing it just once, I gained a new respect for the pattern drafter’s intent and why it is so important when fitting. I changed my understanding of how pants work (it’s all about the waistband), and I no longer feel like my body parts have to get in the way of a good fit. I’ve only spent about a week with the method, but I’m positive that I’ll never look at pants fitting the same way again.

Top Down Center Out vs. other fitting methods 

The next question is: how and when does this method work with other fitting methods? A different way of asking this would be: what are the limitations of Top Down Center Out? Are there common fit issues or patterns that Top Down Center Out can’t handle? Having only used it once, I can’t answer this question, but there are hundreds of examples of the method working beautifully on a diverse range of body shapes and sizes. I am confident that the method is robust and well-validated.

As I mentioned above, one experiment I may do in the future is a head-to-head method comparison, revisiting old patterns that I’ve adjusted using other methods to see how Top Down Center Out compares.  I also plan to try Top Down Center Out on different types of pants, like jeans and slim-legged trousers, for example.  Both are challenging to fit successfully, but with Top Down Center Out, I find myself actually looking forward to the fitting process, rather than dreading it.

Above all, I think Top Down Center Out will be a valuable fitting tool in my collection, and I still have so much to explore about it. If you’ve been frustrated with other fitting methods, or if you are looking for a more accessible, inclusive entry point to successful pants fitting, give Top Down Center Out a try.

59 responses to “Top Down Center Out with the Eve Trousers”

  1. This method seems similar to tissue fitting that Patti Palmer made popular. I have just come across this top down center out method so I am just learning this method. Do they seem similar to you?

    Like

    1. There are similarities to tissue fitting, yes — you are working with half of the pattern to fit in both methods, which works quite well. I think a big difference with Top Down Center Out is that you are working with fabric, rather than tissue, so you really get to see the drape of the cloth as you go and things like a slightly shorter back inseam (like the Eve trousers have) will contribute to the fit of the toile and help you evaluate it. Top Down Center Out also emphasizes changes to the toile primarily at the waistband and outseam, whereas the Palmer Pletsch method says you need to adjust for specific body parts wherever you see fit issues. It is an interesting comparison to think about, and you can be successful with either method.

      Liked by 1 person

      1. Thank you for your insight. I am very intrigued by this method and will hopefully be able to put it into practice very soon. Thank you for your blog posts as well at the instagram posts and videos. I am devouring all of them as well as Ruth’s posts gearing up for trying this method.

        Like

  2. I have been literally waiting for this blog post. Yet to read it in full, and I am sure I will have questions, but thank you for writing in such great detail. I have been intrigued about this method. The pants look fantastic. It’s a pattern I hope to visit soon, so thank you again!

    Like

  3. Great post! We are lucky to have “free thinkers” like Ruth. Thank you for your clear and detailed observations.

    Liked by 1 person

    1. Agreed! Very thankful for her ideas and her hard work! 🙂

      Like

  4. I am so grateful to you for sharing this information with us, I am definitely going to try it myself.!

    Like

  5. Thank you for such a detailed review. I have been following you on Instagram and it has been a learning curve. I am looking forward to trialling this method again. I did try and got quite a good result, but can see where there is room for improvement in my method.
    Good looking trousers!

    Liked by 1 person

  6. Thanks for this post and all your detail. I have struggled with making trousers from patterns and a self drafted block (under tuition) and don’t quite get the fit that I think I want. I have read a little about this method and didn’t quite ‘get it’ but this post has made it a bit clearer for me!

    Like

  7. After religiously following your comparison of 2 indie pants patterns, I knew this would be a “thorough” and thoughtful review of TDCO. Thank you for sharing your process! Your drawings and commentary are so helpful. I would like to know if you feel the concept can be applied equally to elastic waist pants? They are definitely my go to at this stage of my life.

    Liked by 1 person

    1. Yes, it can work for elastic waist pants! Ruth’s article mentions the option of using this on a stretch waistband. I think you’d still want to construct a mock waistband (elastic + casing, with seam allowance where pants would attach) for the fitting process, and I believe I’ve seen examples of elastic waist pants in the IG hashtag. Worth a try!

      Liked by 1 person

  8. Reblogged this on ballsofwool and commented:
    Desperate to give this method a try now

    Like

  9. I am glad to have read your review of this method. I’ve been following Ruth for a while, and read all of the posts about TDCO on Instagram, but struggled to grasp the concept (I’ll admit I didn’t give it my full attention). This is, now, really clicking with me! I’ve got tons of fitting books, all for the purpose of pants fitting, and have taken a pants self drafting craftsy class (yikes! It took 8 toiles to get something wearable), but now I’m off to check out the method link because it’s looking like this method has a lot to offer. Those pants look awesome. I’m amazed at how little adjustment that took! Thanks for the post!

    Like

  10. I’m fascinated by this, particularly because I feel like with traditional fitting methods I end up with relatively the same pant every time, instead of the pant the designer intended. Plus I have that same grainline shift in all my pants and never have been able to fix it. Very intrigued.

    Like

    1. Yes! This is what I think is so cool about this method. I was starting to believe that there was only one type of trouser draft that fits me well, and everything else had to be modified to resemble that. But if you follow Ruth’s IG, that’s one of the main takeaways — there’s not just one crotch curve that fits you and one ideal pattern for your body — any pattern can fit on any body. It feels very liberating.

      Like

  11. I’m fairly new to sewing and have yet to try fitting a pair of pants, but I think it’s in my future. I’m an architect, and the idea of “preserving design intent” really resonates for me—it immediately changed how I think about patterns! Thanks for this.

    Liked by 1 person

  12. This article was really interesting! I used the TDCO method once but I don’t think I fully understood how it works (after fitting my waistband, I actually started adjusting in several places as I’m used to do), and I surely did not pay as much attention to grainline as was required.
    I have another pants project coming up next and I’ll make sure to give it another (proper) shot!

    Like

  13. I have a half-pant cut out and sewed for the TDCO method but I really need to sweep my brain clean of all the methods I’ve used to try to make pants fit. Thank you for your explanation; trying to absorb as much as possible from all testers of this method. BTW, great looking pants!

    Like

  14. I’ve just watched all the videos; thank you so much for taking the time to carefully explain the TDCO method. Your visuals were very helpful. I think I can try it now! Thanks again!

    Like

  15. Like everyone I’m trying to get my head around this new method. How do you determine the amount of ease needed at the crotch, top of inseam? Regards, Sandra

    Like

    1. Hi Sandra, there are a few methods for doing this. First, you can study the product photos for the design you’ve chosen to see how the garment hangs and the fabric moves on a model — this is often enough to know whether the crotch should fit snug to the body, relaxed, or something in between. I have a YouTube video showing how I do this: https://youtu.be/6xdIyVqFcu4. Second, you can study the garment description on the designer’s website or in the instruction booklet, often indie designers will have a section on the intended fit. Third, I have also contacted the pattern company to ask directly how much ease was intended in the crotch if I can’t figure it out with the above two methods. If the pattern company has good customer support, they should be able to tell you. Finally, try not to stress too much about getting an EXACT number for the amount of ease in the crotch, all you need is a ballpark estimate to use as a starting place when you fit the toile. Is it a snug or tight fit? Is it a dropped crotch? What does the fabric look like and how does it drape? Even that is usually enough to get started. I will usually try slightly different amounts of crotch ease as I’m fitting and see what works best with the rest of the design. Some experimentation on your part will always be necessary to customize the design to your unique anatomy.

      Like

      1. Thank you. I’ve found your extremely helpful videos – so much clearer than wading through Ruth’s IS. Well done you. Regards, Sandra

        Like

  16. Such a great post but I’m wondering how this would work for a pattern where the waistband is NOT cut separately from the leg itself.
    I’m so excited to imagine fitting elastic waist pants without the typical “baggy butt”😳
    Thanks so much for your generous input!

    Like

    1. If you are referring to an elastic waistband with a fold-over construction (where the top of the pants is wrapped around the elastic to create a casing), I cover that in my latest YouTube video: https://www.youtube.com/watch?v=q_KFke0leGI. The “baggy butt” on elastic waist pants can be affected by the fit, but it can also be influenced by other factors like the type of fabric chosen (e.g. linen will always relax with wear, there’s no way around it!).

      Like

  17. Thank you so much. I hate to admit this but I’m stuck on how you attach the ban-roll, which is sew-in, to the waistband for the toile. I looked up a method that is easy to follow for making the final waistband in the fashion fabric by Londa Rohlfing, but i don’t see how that in any way looks like the one you made. Is your toile waistband made of two pieces with a seam at the top? Please enlighten me.

    Like

    1. To make my straight waistbands, I cut a long rectangle of fabric that is 2x the height that I want plus 2x the seam allowance. I fold the rectangle in half along the long edge and press it, so that I have a crease that indicates the center fold line that will become the top of the waistband. Then I insert the banroll so that the long edge is nestled along that center crease line. I fold the fabric in half around the banroll, and sew a line of stitches to enclose the banroll and indicate the seamline/seam allowance for the waistband. So I am really just wrapping the fabric around the banroll and sewing it closed, I don’t get too fancy for the toile.

      Like

      1. Thank you. I guess I was overthinking it. I appreciate your quick reply.

        Liked by 1 person

      2. It’s easy to overthink things! I do it all the time. Glad I could help!

        Like

  18. Do you think this method would work with a tilted pelvis? I always have to shorten the front crotch curve and lengthen the back curve. If I don’t I get “hungry” butt and hunching in the front crotch.

    Like

    1. Absolutely. When fitting with Top Down Center Out, the first step was we are fitting the toile to the waistband is to determine the right vertical crotch length, and then the “balance” of the inseam. It’s common that one may need to “floss” with the crotch seam, raising in back while lowering in front or vice versa. I find the one-legged toile makes this relatively more straightforward to do compared to other methods.

      Like

  19. Thank you thank you for all the work you’ve put in to explaining and illustrating this method! One question—are you using the pattern’s waistband or just drafting a new waistband with a strip of fabric and fitting it to your body? If the latter, then could you always use a straight waistband regardless of whether the pattern does? Or does it have to be curved if the waistband on the pattern is curved?

    Like

    1. You could do either! I typically start with the pattern’s waistband, but you could easily swap it out your own preferred waistband shape/style if you like. And yes, you could swap a straight waistband for a curved one or vice versa. Because we are customizing the waistline seam on the pants during fitting, it is relatively straightforward to map that seam onto whatever type of waistband you like. If you are changing from straight to curved or vice versa, I would probably pay a little extra attention to making sure that the shaping elements (darts/pleats) on the pants as well as the waistline seam circumference are matching up well to the new waistband. So once you’ve got your fitting adjustments dialed in, baste everything together and try the toile on again right side out to double check that everything lines up the way it should.

      Like

  20. I’m so appreciative of your thorough and clear instructions. The original Threads article is impressive but intimidating. I learn best seeing in real time how it all comes together. I completed an online pants-drafting course which was very good but still left me basically making the same pants over and over. I love wearing interesting designs drafted by others. Now I can achieve the desired look on MY body. The body positivity of TDCO is also wonderful. It’s depressing to look up fit adjustments and read “sway back,” “flat butt,” “hollow chest,” “knock-kneed,” etc. I wonder if there is a similar process for simplifying the fit of bodices? I’ve yet to sew a (non-knit) top that fits properly without a ton of fussy adjustments. Any suggestions? I’m thinking the shoulders are the key because they support all the rest. Anyway, I’m super impressed by your video tutorials. Thanks again.

    Like

    1. I’m glad the videos are helpful! I know that Ruth Collins is interested in developing a fitting method for bodices as well, so I’m looking forward to future updates from her. In the meantime, I haven’t found anything that simplifies bodice fitting in the same way that Top Down Center Out simplifies pants fitting, unfortunately. So I am using the same old traditional techniques to fit tops until something better comes along!

      Like

      1. I will definitely keep an eye out for news from Ruth Collins on bodice-fitting tips. Meanwhile, I’ll be sewing more pants!

        Like

  21. Wow. Thank you for this analysis of TDCO. I need to study this more to get my head wrapped around it. Also, appreciate the example of Chiang’s story, good analogy.

    Liked by 1 person

  22. I just saw your fantastic YouTube series on Top Down Center Out, and you knocked it out of the ballpark! I’ve seen a few other, similar videos. But yours was so specific and insightful that I really felt that I “got it!” My one issue is fitting for a flat (nonexistent) butt. Could you do a video on how to adjust for a flat butt using TDCO? I just don’t understand how you can remove excess fabric from the seat area, when it has been drafted into the pattern.

    Like

    1. Top Down Center Out doesn’t give prescriptive advice for specific body parts like we are used to with other methods, since the customizations that one can do in that area will be different depending on the body and the pattern. Things you could try are: removing length from the back crotch seam while grading to nothing at the side seams, removing circumference at the hip for the back piece only, or experimenting with cutting a smaller size for your crotch seam in the back or both front and back (generally, going down a size or two in the crotch seam will remove cross-body depth, which you may not need as much of). You can also try experimenting with the dart or pleat intake in the back, since those shaping elements are what help to direct the fabric around the butt — for example, what happens if you make the dart longer? reduce the intake at the dart but increase the intake at the side seam around the waistline? There are a lot of combinations that might get you to your fitting goal, but patience and a willingness to experiment is what usually helps to me get there.

      Like

      1. Thanks. I’ll see what happens!

        Like

  23. I really appreciate the detailed information on constructing the waistband. I was unsure what the circumference of it should be if I chose the pattern according to my hip measurement. My waist is smaller than my hips, but my waist measurement is usually larger than the waist dimension that “goes with” my selected size for a pattern. Your Instagram videos gave more details on this, which helps a lot. Since the Eve trousers have a side zip, do you do anything differently for that (assuming it is a left zip placement and the toile is a left leg)? Thanks so much.

    Like

    1. I don’t think I did anything differently for a side zip, although I put the waistband opening on the opposite side of my toile leg so that I could still get in and out of the toile after it was pinned to the waistband. You may want to look at the pattern pieces carefully to see what extra bits are required along the side seam for the zipper (I don’t remember off-hand), but I ignored the zipper elements for fitting and added them back once I had a fit that I was happy with.

      Like

  24. Hi! This blog and your videos are so helpful! I cannot wait to put this into action. I’ve been working with the Sabrina Slims by Love Notions and going around in circles as one fix creates another problem. I’m curious if you’d recommend anything different for slim or skinny pants where the design intent is to have negative ease. Thanks!

    Like

  25. Your blog post and videos are so helpful! I can’t wait to put this into action on the Sabrina Slims by Love Notions I’ve been working on but keep going in circles as one fix leads to another issue. Do you have any thoughts for using this method when working on something is very fitted and the design intent is negative ease?

    Like

    1. Yes, for a design with negative ease intended for stretch fabrics, I would recommend making a full two-legged toile for TDCO. If you were to make a one-legged toile for such designs, you would see that the center front and center back would pull away from your center due to the negative ease in the design. This would complicate the fitting process and make it harder to interpret the fit of the toile. To solve this, you can make a two legged toile and follow the steps of TDCO as your normally would. When adjusting either side, just do your best to make even adjustments to left and right sides (or take the average of the changes that you made to either side). Hope that helps!

      Like

      1. That’s really helpful info! I appreciate it! Two additional questions:
        1) straight vs. contoured waistband: do you have more info about the pros/cons, when to use, etc? I have some patterns that use each, and I’d like to understand the background a bit more, including if you’re making the rise a bit higher/lower if that will negatively impact the curve shape of the contour band.
        2) do you have a recommendation for interfacing if it is a contoured waistband?

        Like

      2. The decision to use a straight vs contoured waistband is largely driven by the location of the waistband on your body and your personal preferences for fit. Straight waistbands tend to be used more often when the waistband sits at the natural waist, on some bodies this will be a location that is less curvy than lower down near the hips, but obviously every body is different. Contoured waistbands tend to be used more often on mid-rise or lower rise designs, where the body may have more curve as we get closer to the hips. Pros for straight waistband are that it is very stable, easy to construct, and the most straightforward to fit bc you only need to think about optimizing the circumference, height, and location on your body. If interfaced or if using Ban-roll, a straight waistband will not stretch out or loosen over time (could be a pro or a con, depending on your preference). Cons of a straight waistband are that some people find them uncomfortable; if you have a body with a lot of curve between waist and hip, you may find that straight waistbands can dig or gape depending on how much ease you like. Contoured waistbands can be curved more or less to match the contours of the body, but this is an additional variable to consider when fitting, which adds some complexity to the fitting process (e.g. you may have to make several test waistbands with different amounts of curve to get the fit just right).

        If you are making the rise higher/lower on your pants, then you may need to adjust the amount of curve in your waistband. In my blog post about the Shop Pants, I have a graphic that shows you three different waistbands with different amounts of curve and where they were intended to fit on the body. On my body, the higher the waistband, the straighter it can be. But this is something you’ll need to consider for your unique anatomy and fit preferences. It is certainly possible to swap a straight waistband for a contoured one, and Top Down Center Out makes it relatively straightforward to do this using the one-legged toile.

        For interfacing, I typically use whatever I have on hand that is a woven interfacing in a medium weight. I have a lot of interfacing from American Sewing Supply right now, so that’s generally what I’ve been using for contoured waistbands, although I can’t say that it’s superior to any other kind of woven interfacing out there.

        Like

  26. Hi Stacey, thank you so much for your videos and blog explaining this new technique. I have a follow-up to the tilted pelvis question, as I’m not sure I understand how to actually apply the method to adjust a pattern. After “flossing” to get the correct crotch positions on the front and back with the right amount of ease throughout the crotch area, the inseam moves well to the front of the body and the crotch point is no longer in the centre of the body. If I go with having enough ease in the back crotch and leave the CP in the centre of the body, then the front crotch has too much vertical ease so I would need to re-shape the front crotch curve – is that the correct application of the method? Do we then need to move the inseam to re-balance the front and back, and if so, how would you go about doing that? I can only see where adjustments are made to the waist levels and the side seams, so I’m not sure how/when adjustments are allowed to be made to the crotch curve itself. Long story short – the crotch curve is the right length, but it is at the wrong angle. Thanks again!!

    Like

    1. Good question! It’s tough to give specific feedback since I don’t know what design you’re working with and can’t see what the toile looks like, but in general, the crotch point does not always have to be at the center of the body. This is a “rule” that we are given when using the traditional fitting/drafting methods, but it’s one that is often broken when looking outside the advice from drafting textbooks. On some designs, the inseam and crotch point are more forward, and on others, they are more central between your back and front. A more forward inseam can allow for more/better leg movement, so sometimes it can be advantageous to place the inseam a little more toward the front (the Lander pants by True Bias are a good example of this). So to address your question, I would first ask whether the design still works with a more forward placement of the inseam. If the answer is “no”, then I’d ask if there is another way to get to a well-fitting toile? The “flossing” I refer to in the videos usually means taking length away from the front and adding it to the back, or vice versa. But it’s also possible to keep the crotch length in the front fixed while adding or subtracting to the back — it’s a subtle difference and but will move the crotch point and inseam less. Finally, since you mentioned having enough ease in the back crotch, I want to mention one other possible adjustment: if you feel that you’ve exhausted your options with the toile that you cut out, you may want to consider going up or down a size in the crotch curve, which can also change the way that the ease is distributed in the crotch seam. For example, going up a size in the back crotch curve could give you more ease in back while keeping the crotch point and inseam position unchanged. To do this, you can use the toile that you already have, but trace the crotch seam and corresponding cutting line for one size up (or one size down for less ease), then re-sew the toile using the new crotch size. I am planning on making a video about this, too, so hopefully that will help!

      Like

  27. Rosemary Slattery Avatar
    Rosemary Slattery

    I know that I have to alter the length of my pants pattern (way too long). Do I proceed in doing this before using the TDCO Method.

    Like

    1. Yes, if the leg is way too long for you, then you will shorten the pattern before making the toile. The reason we shorten before the toile stage is because we don’t want the hem of the pant leg resting on the floor or the top of the foot. If that happens, it can interfere with the way the fabric drapes from the top of the garment, which can make interpreting the fit more challenging.

      Like

  28. Thank you for your great videos. I’m working on a pair of trousers with an elastic waistband. I’ve followed your videos and got as far as fitting. I was really pleased with the fit until I tried to lift my leg up! It pulls the back waistband downwards and has drag lines from thigh inside leg to knee. Do you have a fitting video that I’ve missed that will help me figure this out? I’ve started again and again but end up in the same place!! Many thanks

    Like

    1. Hi Charlotte! Congrats on getting this far with TDCO! I have a few thoughts. First, it is very normal to see drag lines from thigh to knee like you describe when you lift your leg. If we move from a standing position to any other posture (lifting legs, walking, bending, etc etc), a well-fitting pair of pants will accommodate those movements and the drag lines are a normal part of how the fabric moves with our bodies. What is more bothersome is when the waistline gets pulled down, also as you describe. I don’t know what pattern you are using, so much of this will depend on the design, but here are my thoughts:
      1. When we lift up our legs or sit down, the back of the body lengthens, and usually the hip circumference grows. Well-fitting pants need to accommodate this expansion somehow. There are a variety of ways that a design can do this, and in some designs (like non-stretch denim jeans), some amount of waistband gapping or downward pulling in back is normal and expected when we bend or sit. For elastic waist pants, the waistband is much more flexible than in most other types of pants, so the downward pulling when you bend or sit can be more pronounced.
      2. To remedy the waistband pulling down, I would add ease to the crotch seam and hips. Is the crotch seam of your pants fitting snug to the body? Is the hip circumference snug as well? If so, then when you sit or lift your leg, there is no extra room for the back of your body to expand, and because the waistband is flexible, it will be tugged downward to accommodate the extra body length. Adding vertical ease to the crotch seam by lowering it further away from the body should help. You may also need to add more ease to the hip circumference.
      3. Some amount of downward pulling on the waistband when you sit or bend can be completely normal, and it’s really up to you as the maker and wearer of the pants to decide how much is too much. For the waistband on a pair of elastic waist pants to not budge *at all* as we move, you will probably need to add quite a lot of ease everywhere, and that may not be the look that you want aesthetically. So there is always a balance here — what look or silhouette do we want? and what is necessary for the garment to be comfortable and to allow for a range of movements? As makers, we get to decide what to prioritize and how to balance all of these elements.

      Like

      1. Thank you so much for your thoughts. They have really helped….I think I know what to try next! Many thanks Charlotte

        Like

  29. Let me start by sincerely thanking you for the huge amount of time and effort you invested not just in blogging about TDCO but making a detailed video series!
    Very generous of you. 🙂 The overwhelming feedback you get is testament how many women are delighted to finally have nicely fitting pants, cutting out what can be a frustrating fitting challenge.

    I wanted to share observations from my sewing, fitting, drafting and dressing in pants experiences that aren’t unique but I found too little in books, magazines, blog posts or videos.
    For one, ‘What determines good fit?’ is such an excellent but fundamental question with no universal answer to it. It’s subjective and personal. If _you_ like the fit, do a happy dance and go for it! 🙂 Similarly, if _you_ think the fit isn’t right, don’t settle for what others think about it.
    Another observation is that well-fitting pants and flattering pants aren’t necessarily the same. Ideally they are but that’s not a given and ofc it’s also subjective and personal.
    It’s important though to distinguish the two. 🙂

    Coming back to TDCO, it can be frustrating to _not_ experience the ‘eureka!’ moment the majority does. That’s why IMHO, as with so many things in life, expectation management is key. For instance, for those of us with deep lower torso space (saddle) that needs to be mainly addressed at e.g. the _shapes_ of the back crotch seam and inseam, it’s possible that TDCO will improve but won’t fix these fitting issues. Which is perfectly logical. 🙂

    Take from TDCO what works for you but don’t beat yourself up if you don’t achieve the fit and look _you_ like. Make additional adjustment as desired and enjoy working with different tools to get to a pair of fitting and flattering pants. 🙂

    Like

    1. These are excellent points and this is why I emphasize that TDCO is a tool one can use to build the optimum relationship between the body and the design of the pattern. There is no formula that can be determined in advance for every body to fit every style of pant in the way that they wish that that garment to fit. That is why discussion of the design and draft (also the fabric) is so important in addition to a toile. For instance a basic top in a woven fabric that has no darts may never reach the fit expectation of the maker without adding in a dart. Knowing when one has reached the maximum the pattern offers you and then what to do if you are still unsatisfied takes learning. To date there is nobody except Stacey who is doing this with pants and pants patterns.

      From a personal perspective I hear from both the people with and without the ‘eureka’ moment, often the latter are annoyed they do not have such a moment. Sometimes they are angry with me which is hard both on an emotional level and also because I can often tell that there is an issue that is readily apparent in the toile such as the length and width of the crotch curve that is fully covered in TDCO. I think this will gradually change with more education but in the meantime, even people who do not understand or have time to learn how it all works can use the basic outline which is very robust. Even if you fit ‘outside-in” rather than “center-out” or use balance lines etc. whatever type of fitting you prefer, people find that using the basic framework outlined in TDCO is a big help. I encourage everyone because it is the outcome that is important and should be celebrated.

      Liked by 1 person

  30. Hi! Thank you SO much for sharing all these resources! I don’t know if I missed this in the video, but exactly how do you know where to make adjustments on the toile? Do you just do a point at the crotch seams and side seam as to how high the leg should be (thinking of the waistband being fixed and markings going at three points of the toile), Or do you mark all the way around the leg/toile where on the waistband ithe leg sits? I hope that makes sense… I think I understand the concept (going to try it soon with an elasticated tapered pant (Meghan Nielsen opal). Excited to make this work!

    Liked by 1 person

    1. Good question — I think either way will work, whatever works best with your process! I typically will mark the leg about every inch or so all around the waistline so that I know exactly where to draw in the new seam once I take the toile apart. Hope that helps!

      Like

  31. This is wonderful. I’m a new sewist and am excited to take on this project next. Is there a doc with all the instructions and diagrams you provided during the videos that I can print out to use as a worksheet, for my future reference?
    Thanks!
    Beth
    Utah

    Like

    1. Hi Beth, I’m so glad these resources are helpful. The best source for written instructions would be Ruth’s Top Down Center Out article in the Summer 2022 Issue 218 of Threads magazine. Many folks have been able to find this issue through their local library, or you may be able to buy it directly as a single issue from Threads. I also know that Ruth Collins is working on some additional written resources, as well, and these will go deeper than the Threads article. So keep an eye on her Instagram page for the latest updates: https://www.instagram.com/ithacamaven/

      Like

Leave a comment