
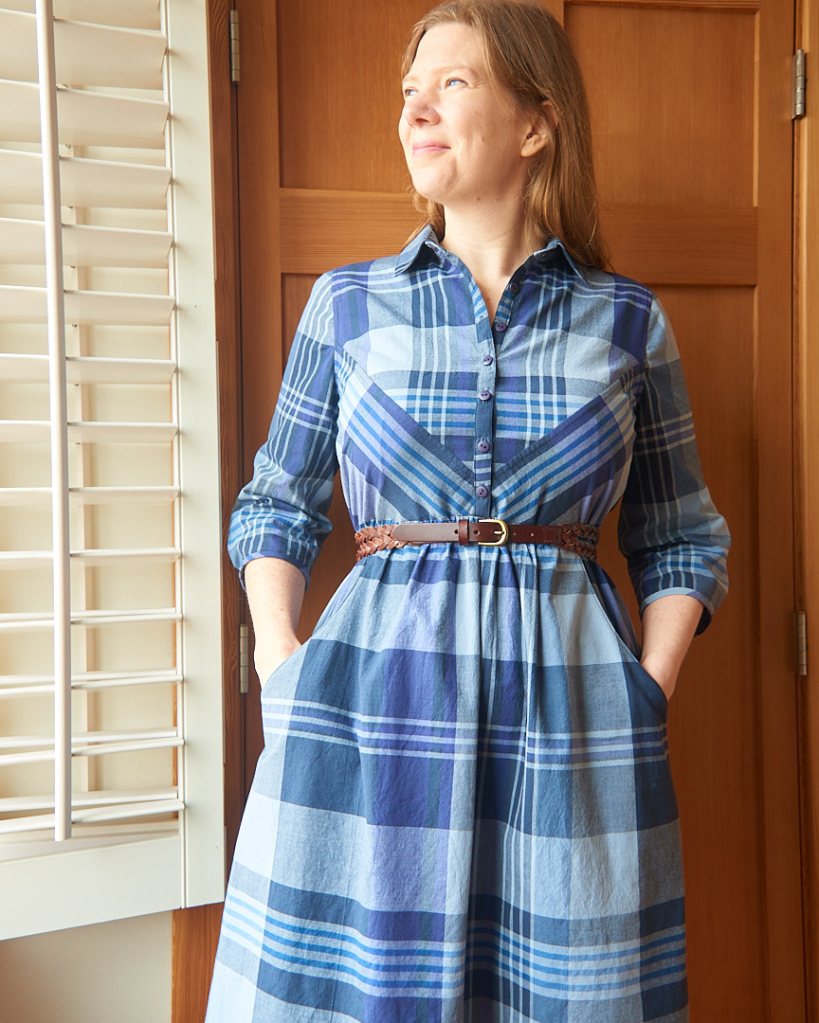
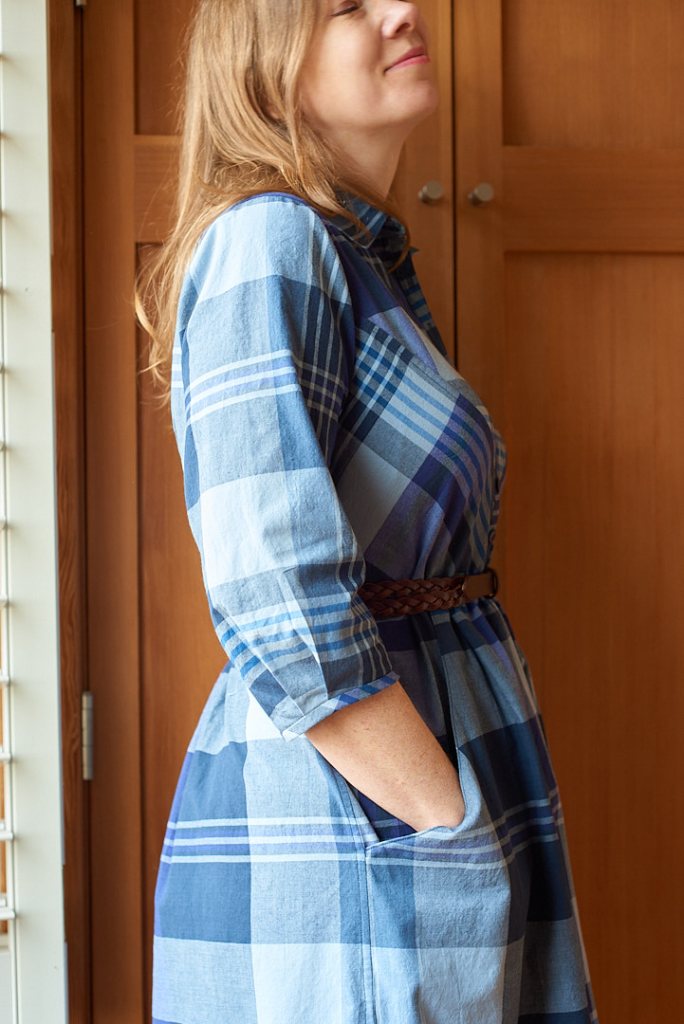
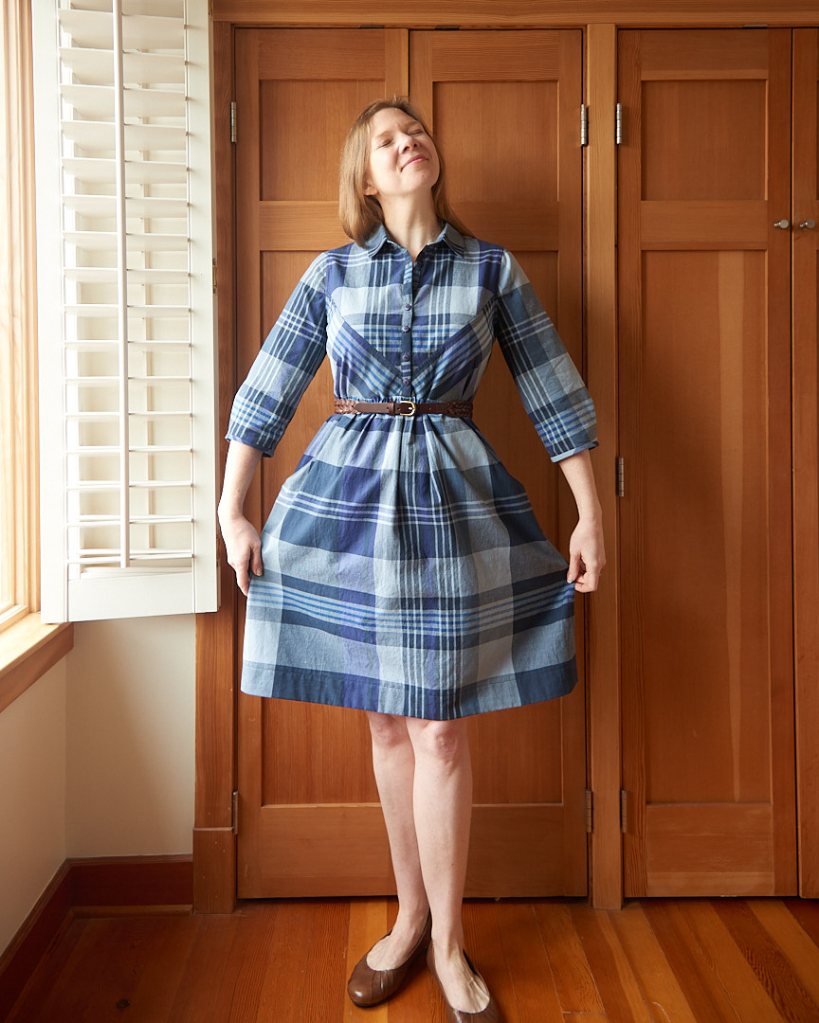
I’ve made a lot of button up shirts over the years, and the Isca dress by Marilla Walker has always caught my eye because it is a unique twist on a classic design. The princess seam on the front bodice creates a stunning “V” shape and is a great way to emphasize a bold stripe, directional print, or color blocking. There’s also a clever shoulder construction that omits a traditional shoulder seam entirely.
I used a soft, mid-weight cotton shirting for my Isca, which might be an ideal fabric for this pattern because it’s structured but isn’t too bulky in the gathers. I cut my lower bodice pieces on the bias, which is not what the pattern instructs you to do, but it works beautifully and makes for a lovely cinched waist illusion.
Sizing and Grading
Isca goes up to a 48 inch bust and 50 inch hip for View A. Generally, there is a 1 inch grade between size 1 and size 2 across the bust and waist, and a 2 inch grade between all sizes above size 2.
There are a few discrepancies between the US/imperial and metric size charts, possibly due to the rounding error introduced when converting from cm to inches. I messaged Marilla about this, and she said she’d look into it. Below is one example where the finished waist measurement doesn’t match when comparing across the two charts.

There are few other little quirks to the US size charts, too, probably due to the metric conversion. So I’d recommend using the metric size charts to choose a size and make your desired ease calculations, and then measure your pattern pieces to double check.
Fit
This dress is designed to be “very fitted at the shoulders and relaxed at the waist”. Reviews are generally positive, but I couldn’t find much discussion of fit or what common adjustments were needed, which was a little surprising. Some IG posts mention sizing down because the dress is very roomy in the waist, but I’d think twice before doing that. If I had sized down, I probably wouldn’t have been able to get my arms through the sleeves.
I made a toile with no adjustments to assess the fit. My high bust is 37 inches and my full bust is 40.5 inches, so I chose a size 6 (drafted for high bust 38, full bust 40 inches). I noticed a few fit issues right away:
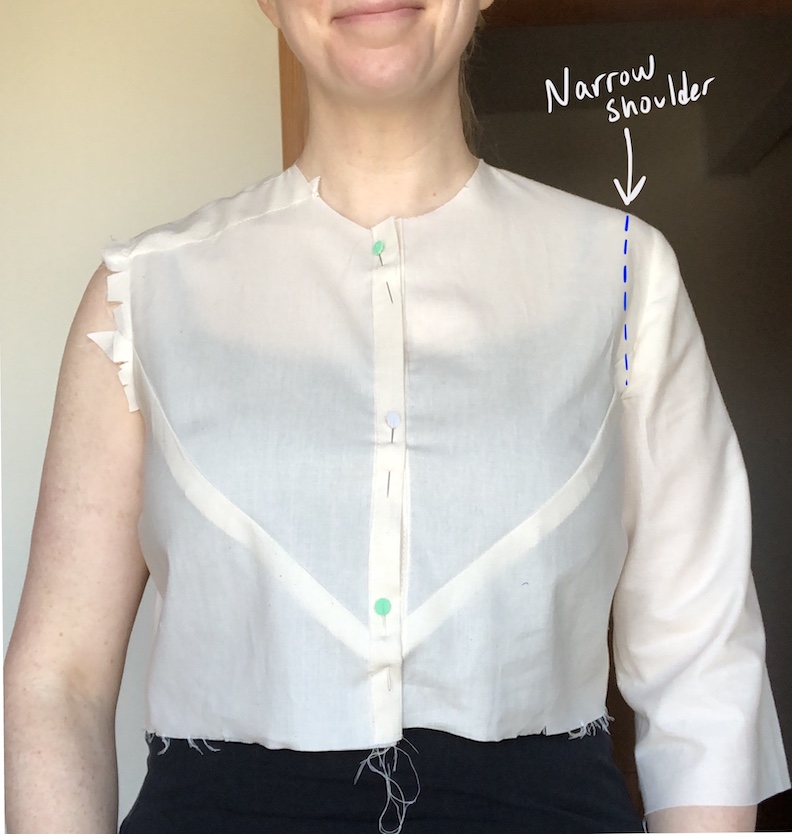
- The shoulders are wide on my body and fall well beyond my shoulder bone (a common fit issue for me).
- The sleeve is too tight and it restricts my arm movement so much that I can’t raise my arms higher than 45 degrees. I have about 1 inch of positive ease through the bicep, which is not enough for me to be comfortable throughout the day. Two inches is a good general rule that I use for bicep ease.
- Similarly, the armscye is very snug around my arm (photo below shows the armscye clipped to the seam line). The seam line touches my armpit if I stand naturally. I need a sloped shoulder adjustment to lower the entire armscye, or at the very least, I need to add length.
- Helpfully, the upper bodice pattern has a line indicating where the top of the shoulder is intended to be. I have forward shoulders so I need to shift the peak of the armscye and sleeve cap forward to match my anatomy.


Adjustments
The Isca pattern includes instructions for how to do full bust and small bust adjustments. You can also find supplemental instructions for full bicep and narrow shoulder adjustments through the link in Marilla Walker’s IG profile. I don’t think it’s a coincidence that there’s a supplement explaining how to do the exact adjustments that I needed. I’m guessing these are common fit adjustments for this pattern, but I can’t be sure since there are few detailed fit reviews.
- Narrow and forward shoulder (bodice): I used my own method for the shoulder adjustments, rather that Marilla’s instructions (although I think hers would also work). The bodice doesn’t have a traditional shoulder seam at the top of the shoulder, and instead the upper front bodice wraps around the shoulder in a gull wing shape, and it connects with the back bodice at your shoulder blade. No amount of sizing down would have placed the edge of the shoulder at the right place for me, so I narrowed the shoulder by scooping past the smallest size, removing 3/4 inch from the edge. I also moved the peak of the shoulder curve forward by 5/8 inch (blue arrow, below).

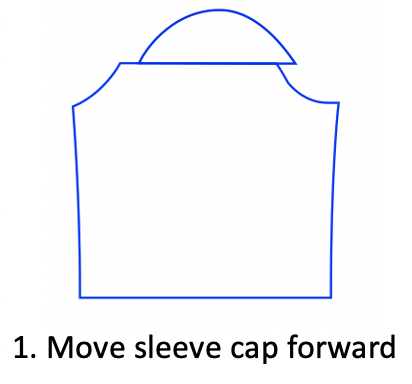
- Narrow and forward shoulder (sleeve): I always adjust bodice shoulder and armscye first, then change the sleeve with the reciprocal adjustments. Because I moved the armscye seam inward by taking away fabric from the bodice, I need to add it back to the sleeve cap. I also need to push the sleeve cap forward by 5/8 inch to match the new armscye curve.


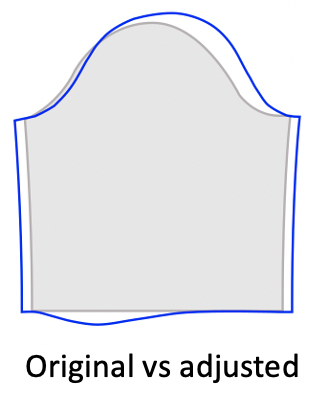
- Full bicep adjustment: To increase the sleeve ease and deepen the armhole, I did a standard full bicep adjustment. First I adjusted the sleeve to make it wider, then I lowered the bottom of the armscye to accommodate the longer sleeve head. I also added extra room for elbow bend in the sleeve, which I gathered into 2 pleats on the finished garment.


- Reduce ease in the waist: I added darts to the back bodice by pinning out fabric on the toile and transferring this to the pattern. You could also just trace the View B back piece, which has darts. I left about 4-5 inches of ease in the waist because I didn’t want to over fit.
Construction notes
- The pattern calls for 3 yards of 60″ fabric, and I had 3 yards of 45″ inch fabric that I planned to pattern match, but it still worked! I had to shorten the skirt pieces by about 4 inches and made the pocket facing and under collar from a different fabric.
- I cut the lower bodice piece on the bias to emphasize the princess seam, and I love the outcome. If you are using stripes or plaid with this pattern, there are a number of interesting visual effects you can create by manipulating the grainline here.
- I love a well-notched pattern, and Isca is a great example of one. Tracing all the notches and dots onto your fabric is SUPER important for the construction of this dress, so don’t skip over those.
- The pattern calls for flat felled seams throughout the bodice construction, including the armscyes. Flat felled seams on a curve can be tricky, but it gives such a professional finish to the final garment that it’s worth a little extra time to get it just right. I love the result.
- I didn’t use the collar instructions, instead I used David Page Coffin’s shirt making method (summarized here), which gives me great results so I don’t deviate from it.
And there you have it. I’m quite pleased with how this dress turned out, and I love the vintage look of this fabric and pattern combo. Next, a linen version is in the works!


Leave a comment