In today’s extremely niche blog post, I’m sharing my construction notes and photos for the Now trousers by Ann Ringstrand, which I reviewed in a previous post. The published instructions for this free pattern are quite sparse and often confusing, so I’m sharing these notes for anyone who needs the extra visuals and/or tips. My notes are supplemental to the published Now Trouser instructions and not meant to be used on their own — please read both carefully!
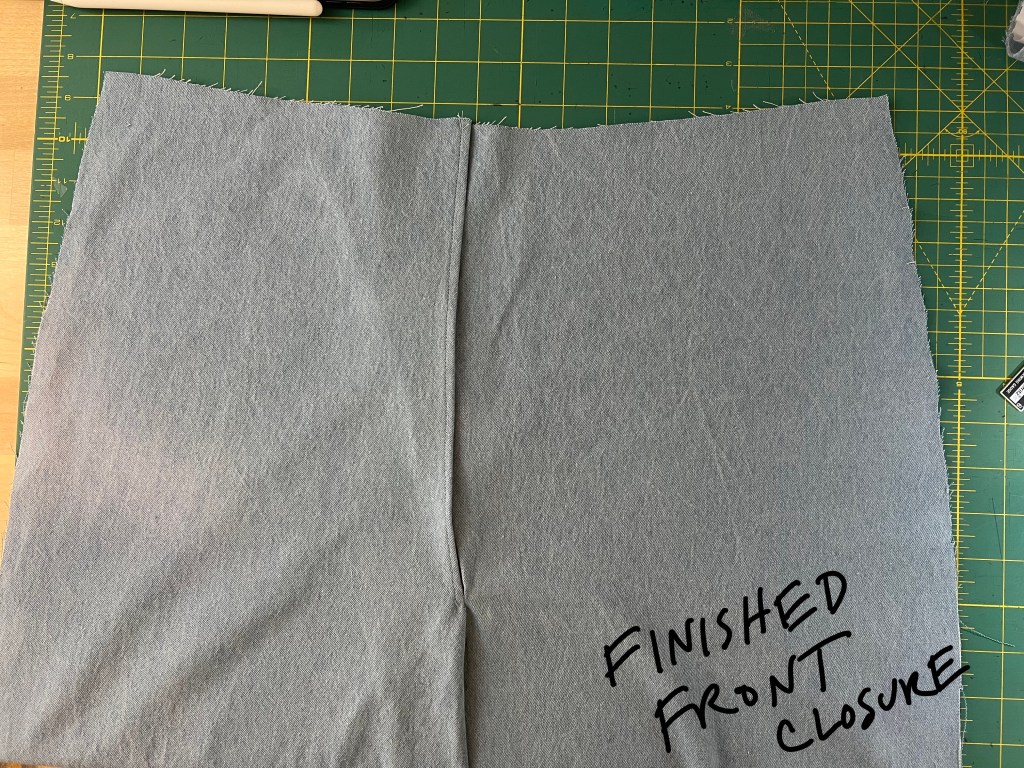
Front Closure
- Sew the knee darts on both front pieces. I also added topstitching to my darts.
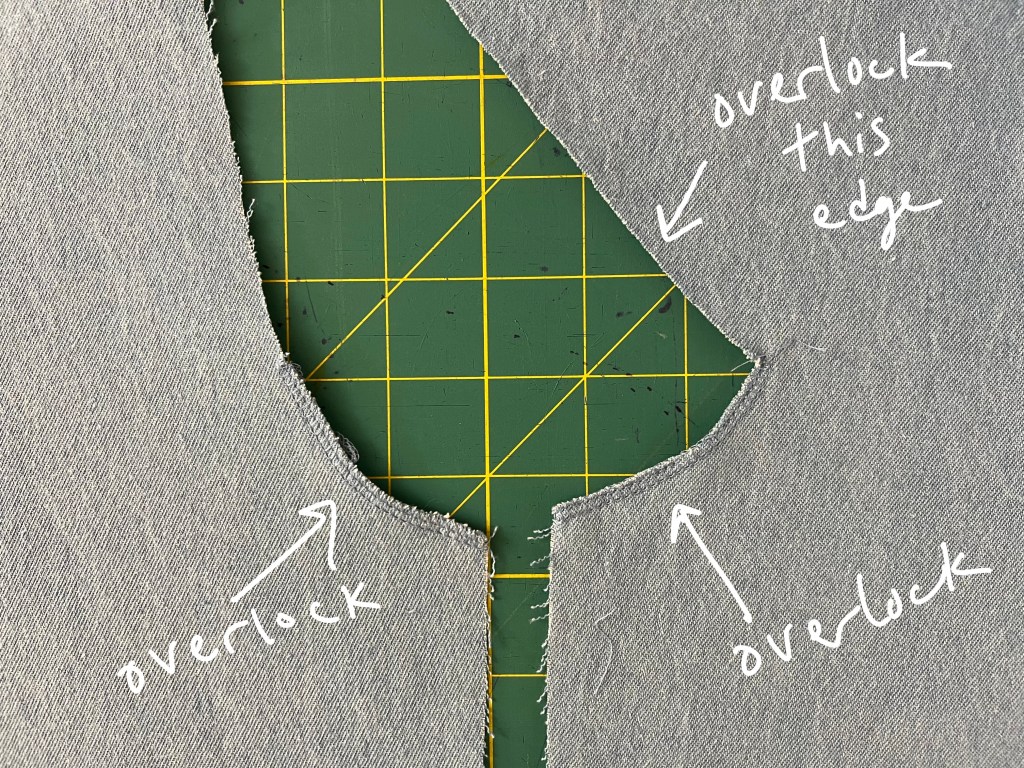
- Overlock the front crotch seams. I also added overlocking to the left front closure along the edge. This edge seems like it could get exposed in the wash, and I don’t want it to unravel.
- Stitch both front pieces together along the crotch seam and press the seam open. Backtack well. The construction of the front crotch seam is a weak point in the garment, as the wrap front prevents it from being flat felled for extra stability. Even as I was sewing these pants, the weight of the garment pulled on this seam. I may try to reinforce the top of the crotch seam where it meets the front opening after wearing these for a season.
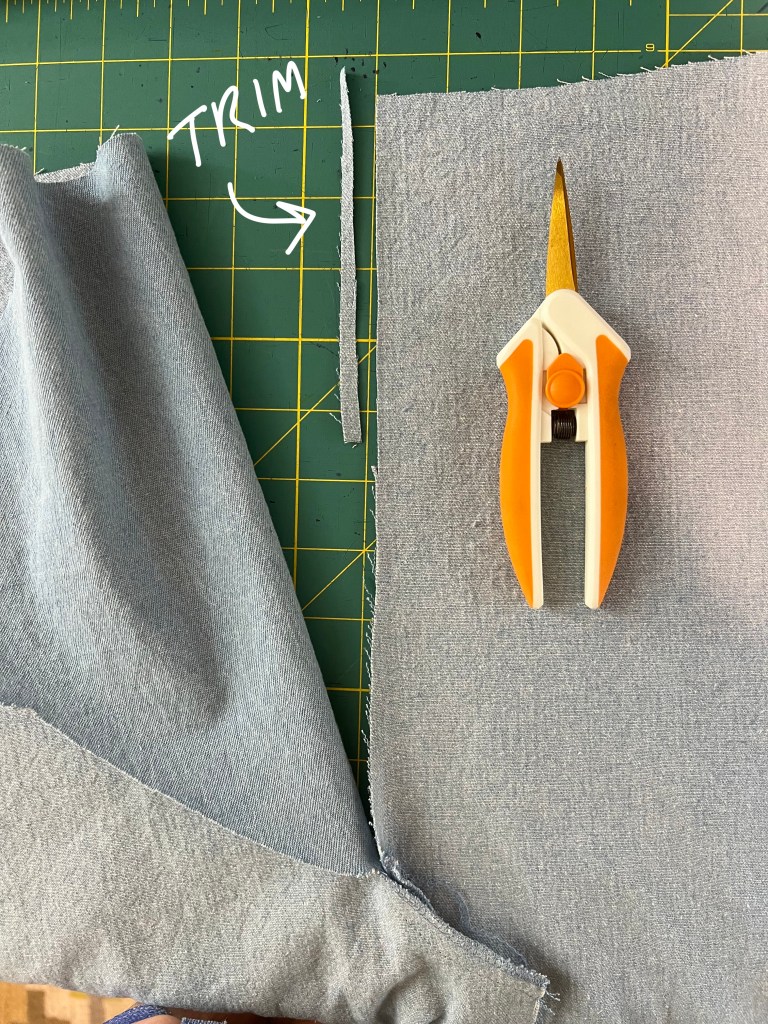
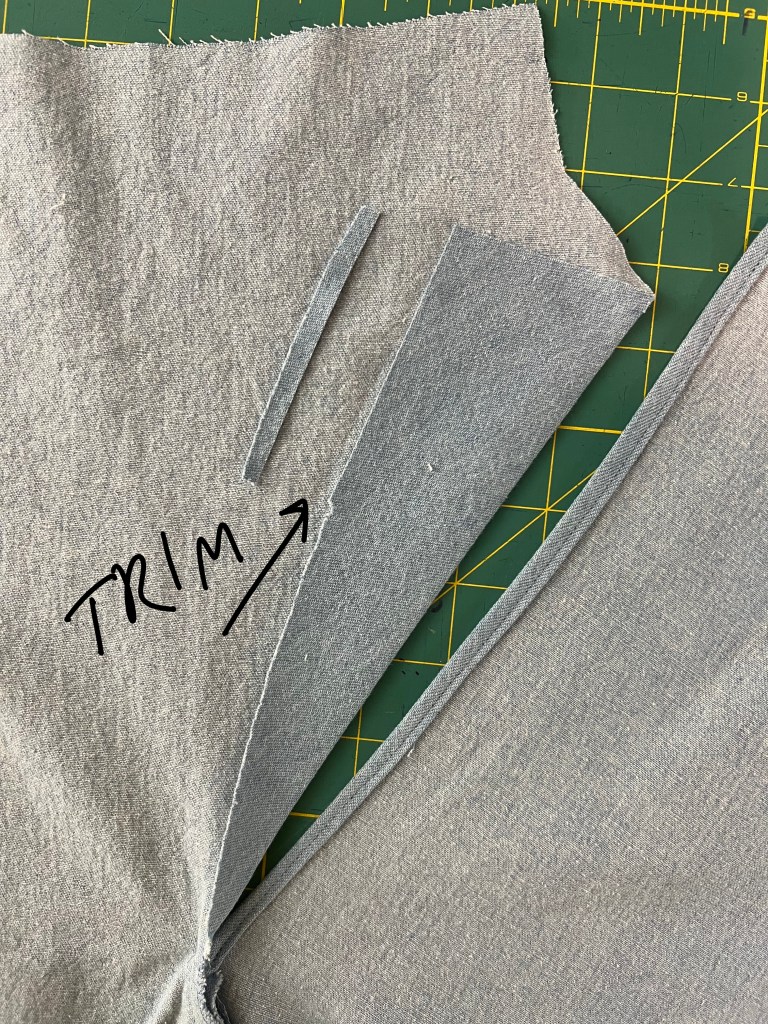
- I don’t understand why there are short overhangs on both center fronts. This overhang is never addressed in the instructions and never pictured anywhere in the illustrations. I trimmed it off on both sides.
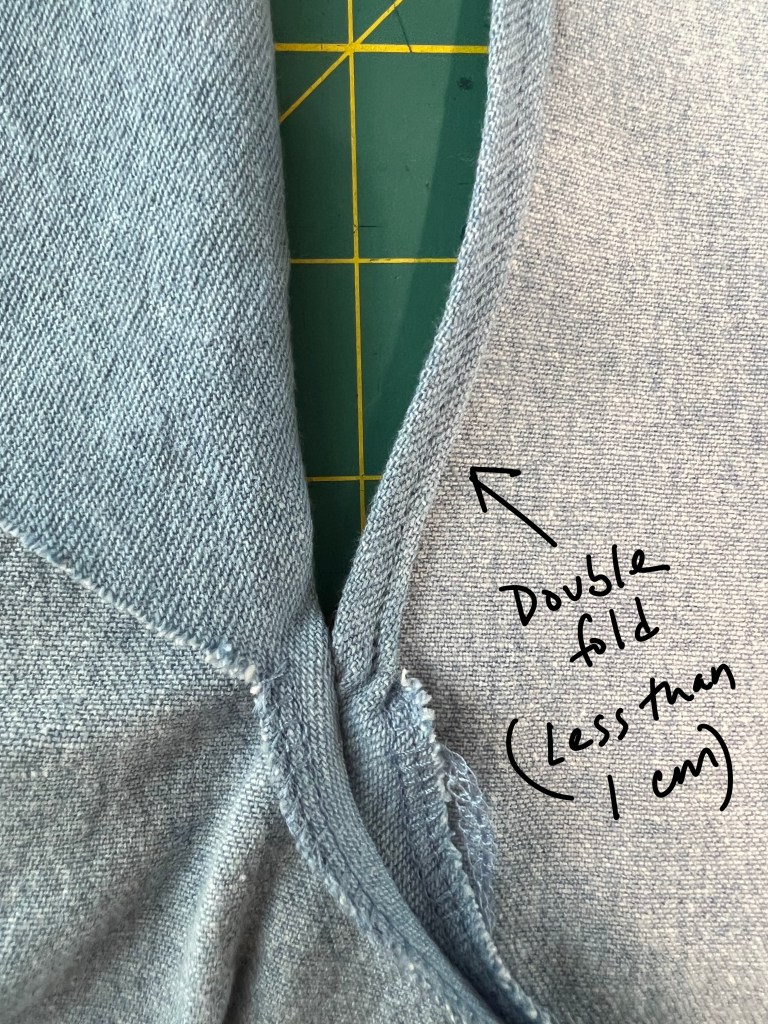
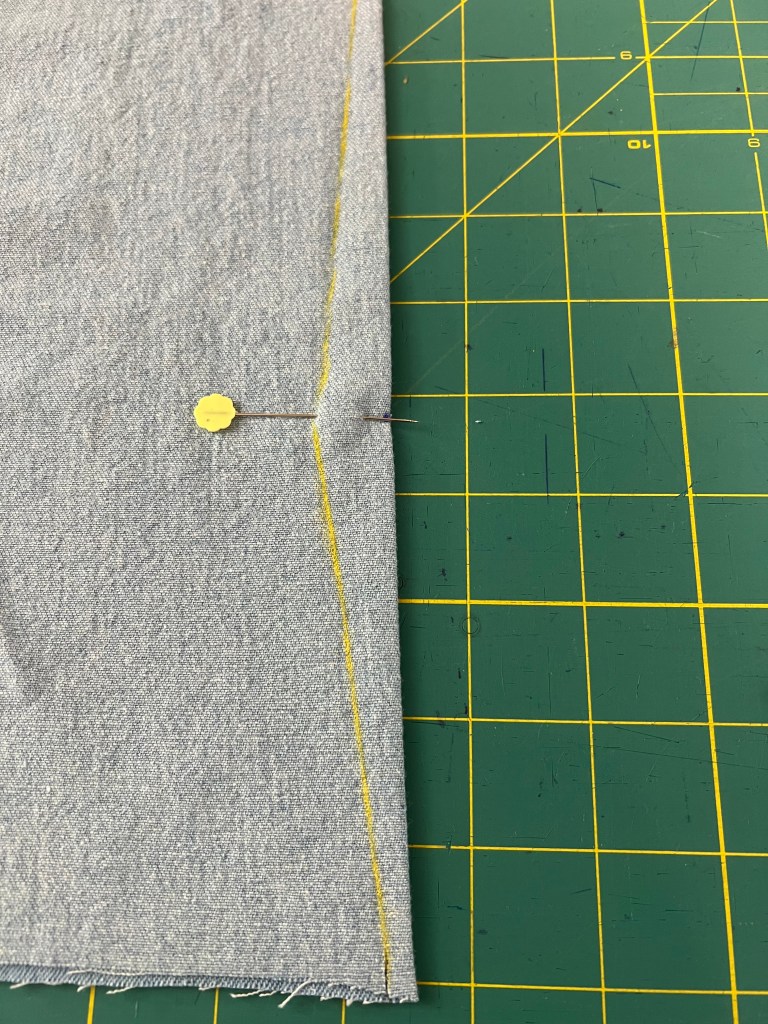
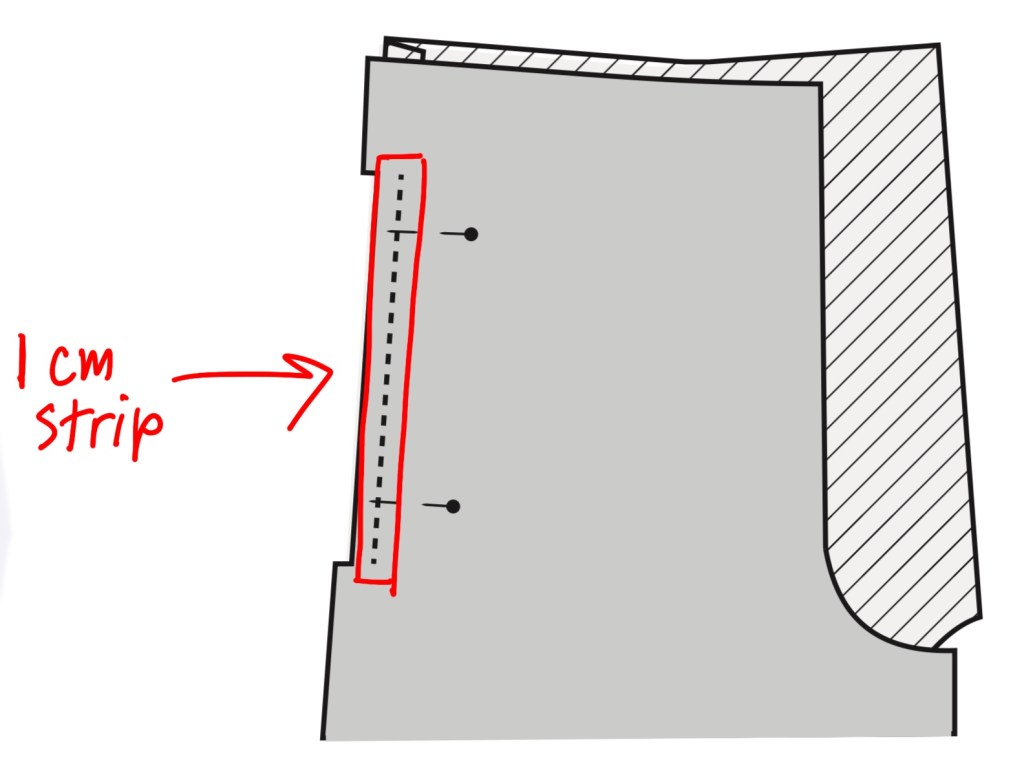
- Next, finish both center fronts. The instructions are SUPER vague here. For the right center front, I folded twice to conceal the raw edge, but I found it easier to execute if the double fold was smaller than what was called for in the instructions. If you use 0.8cm and 1 cm as directed, then you are folding past the seam allowance at the crotch seam and you get some wrinkles. I folded just enough so that there was not tension or pulling on the crotch seam.
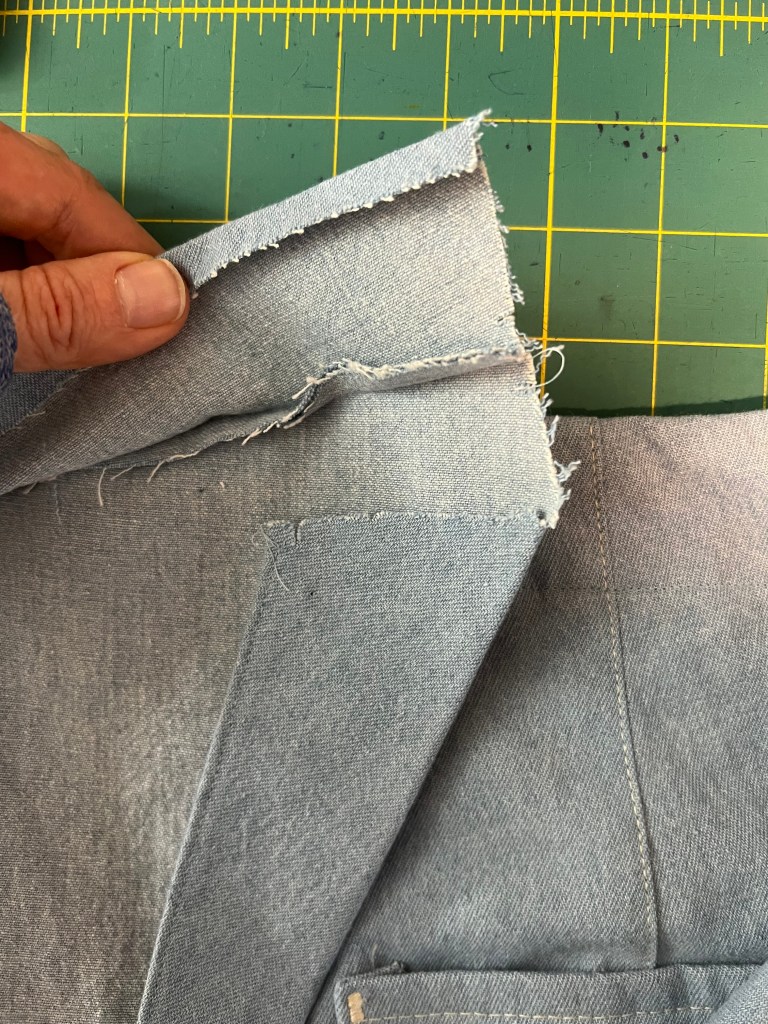
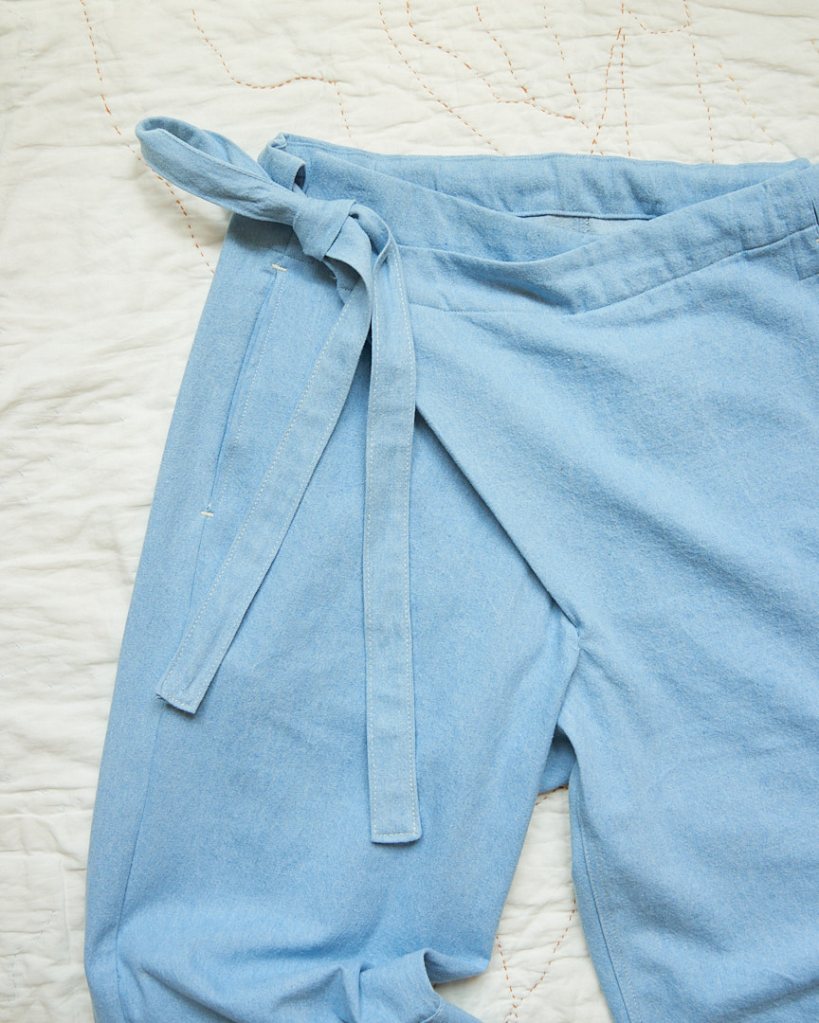
- For the left front closure (the wrap), I trimmed the overhang and then folded the triangular wrap piece over twice. The notch that is supposed to indicate where to make the first fold didn’t seem to work for me — it makes the fold too large so the subsequent second fold becomes too deep. You want to fold the front so that the top edge of the folded part of the fabric will be caught in the waist facing stitches later. Like this:
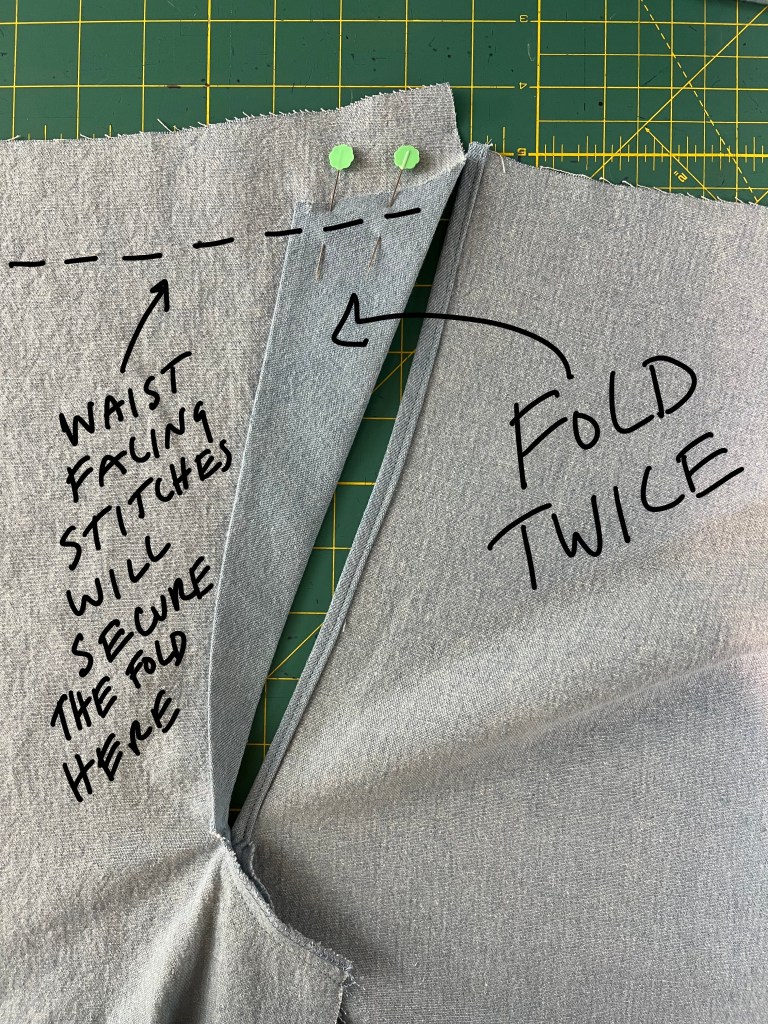
- I also added edge stitching after making the first fold. It might be overkill, but these stitches will hopefully keep the fold in place during washing and prevent the edge of the fabric from flipping out. These stitches are ONLY through the fold, they don’t show on the right side of the garment when worn.

Back Leg
- Sew the back waist darts and back hem darts. I also added top stitching to the darts.
- Note: on my printer, the pattern pieces were placed so that a majority of the back dart was lost in the margin, so had to carefully measure and re-draw half of the dart legs. Some guesswork was involved here.
- I found it easiest to sew the hem dart by marking the stitching line in chalk first.
- Note: on my printer, the pattern pieces were placed so that a majority of the back dart was lost in the margin, so had to carefully measure and re-draw half of the dart legs. Some guesswork was involved here.
- To construct the back pockets, double fold the top edge of the pocket and topstitch. I added two pockets, one on each side instead of only one on the right. Attach the pocket to the back leg using the pattern markings
- Sew the back crotch seam, finish the edge, topstitch 2mm and 8mm from the edge.
*** I deviated from the order of operations at this point in the construction process. It doesn’t make sense to sew the inseam first, and then attach front pocket bags, as you are just adding weight and bulk to your work needlessly.****
Side Seam Pockets
- AR’s written instructions for attaching the pockets are pretty good, but the diagram that accompanies this section is incorrect. The top of the pocket bag should sit several cm below the top edge of the front leg, use the notches for the pocket opening to align both pieces.

- For thin or loosely woven fabrics, consider adding a strip of interfacing along the pocket opening to prevent stretching/gaping.
- I ignored the instructions for finishing the bottom of the pocket bag with a French seam (step 4c and 4d). Instead I used a 1cm seam allowance and then overlocked for a less bulky finish that is less likely to show through on the front of the pants. My fabric for these trousers was relatively heavy (8-10 oz denims), so thinner fabrics might do just fine with a French seam here.
- Overlock the side seams for front and back pieces. I did this BEFORE sewing the inseam, otherwise the work becomes heavy and awkward to manage at the serger.
Inseams
- Stitch the inseams together, press the seam allowance toward the front and top stitch as directed.
Side Seams
- Stitch the side seams together as directed by the instructions, press the seams open, and place bartacks above and below the pocket openings.
Waistline Facings
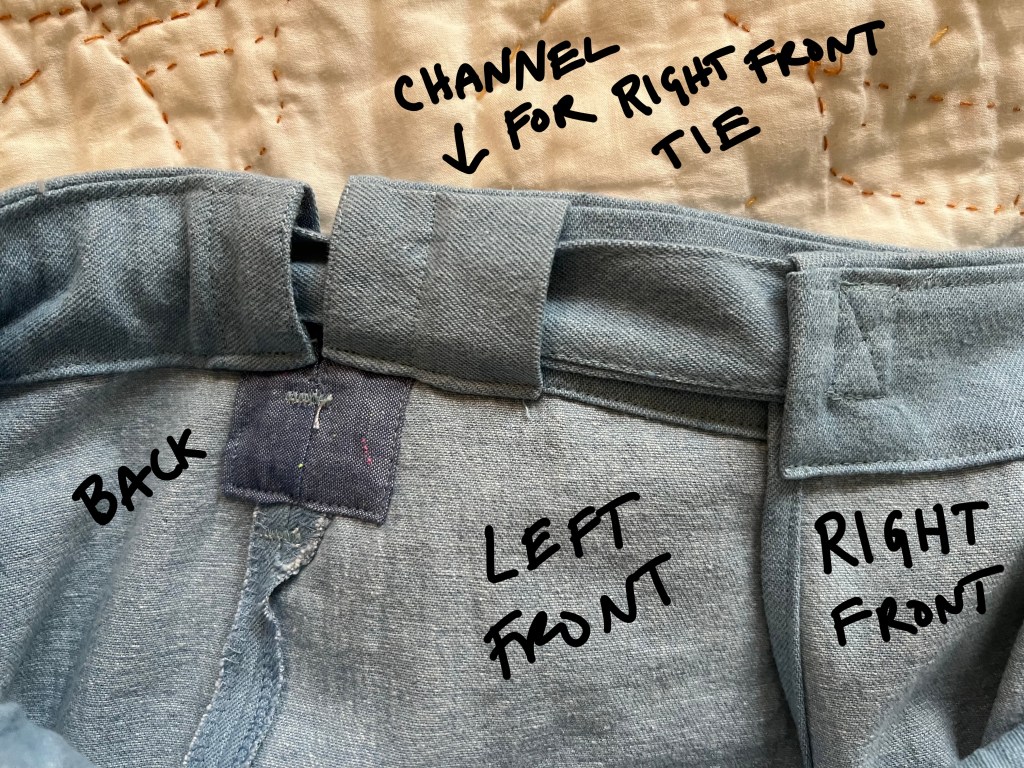
- Inside the front waist on the left side is a small channel that will carry the tie from the right side as it feeds into the back waist channel on your left side. Here is what it looks like on the inside of the finished garment:
- The pattern piece for this little channel is super confusing and is just called “waist facing, front left side”.
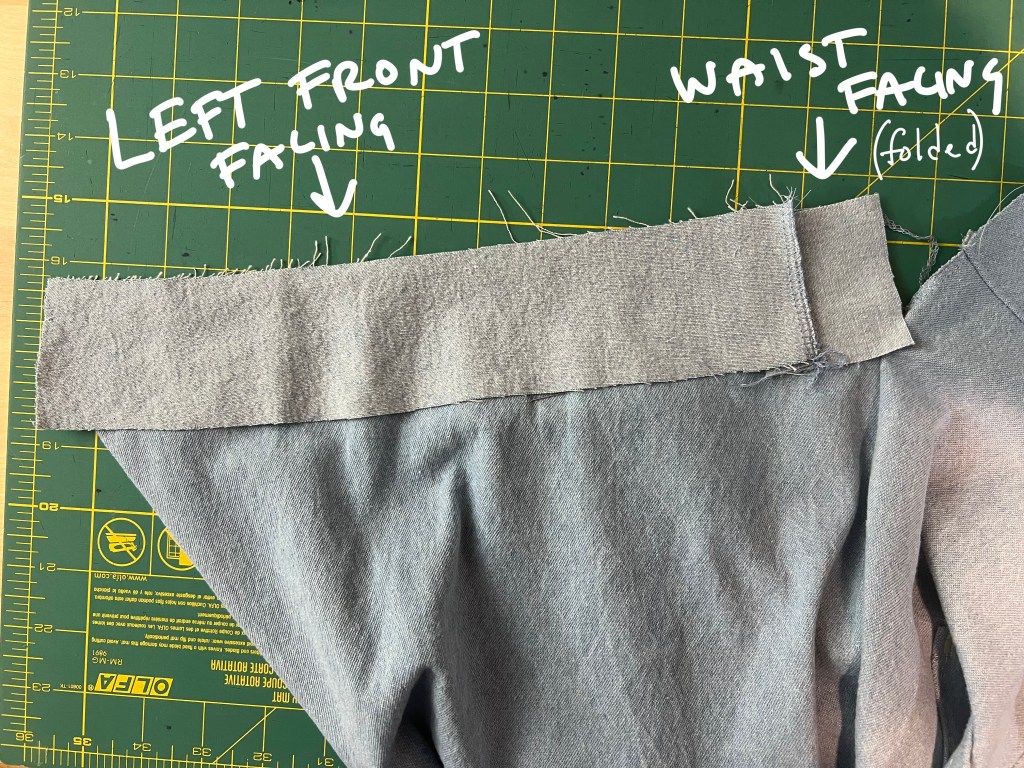
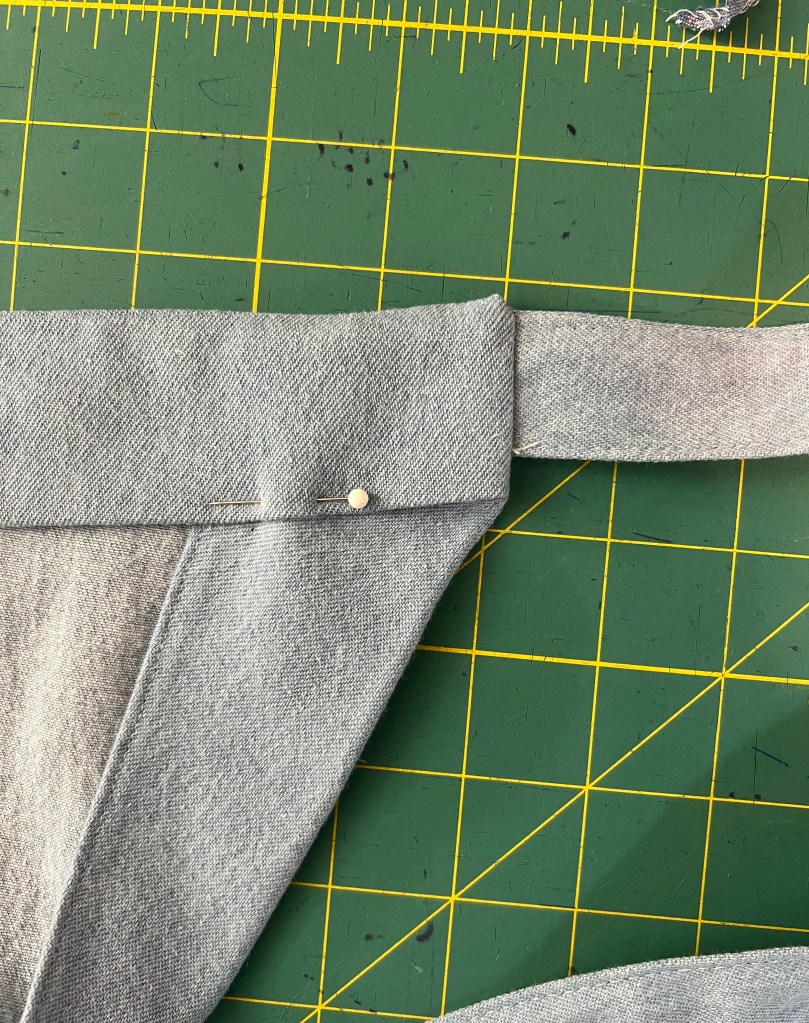
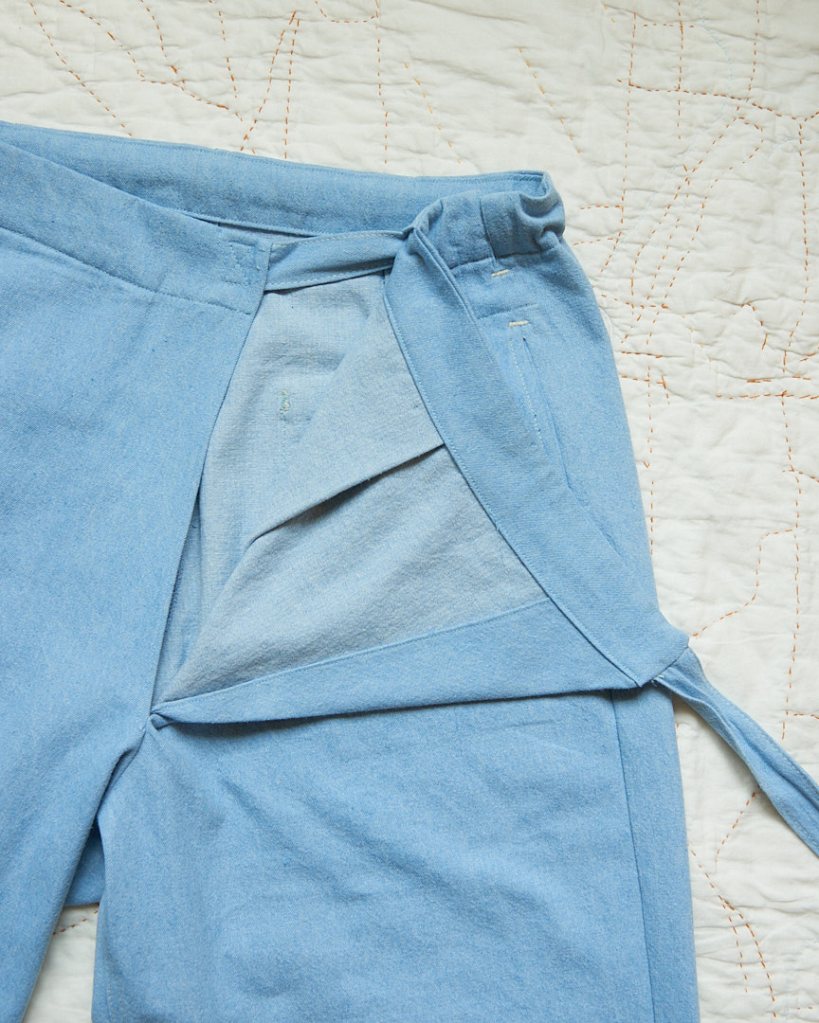
- Technically there are two facings that will be applied to the left front: a smaller facing that creates this little channel for the belt AND a separate, longer facing that will finish the top edge of the pants. This is what you are aiming for as you sew the top edge of the waist facings to the pants:
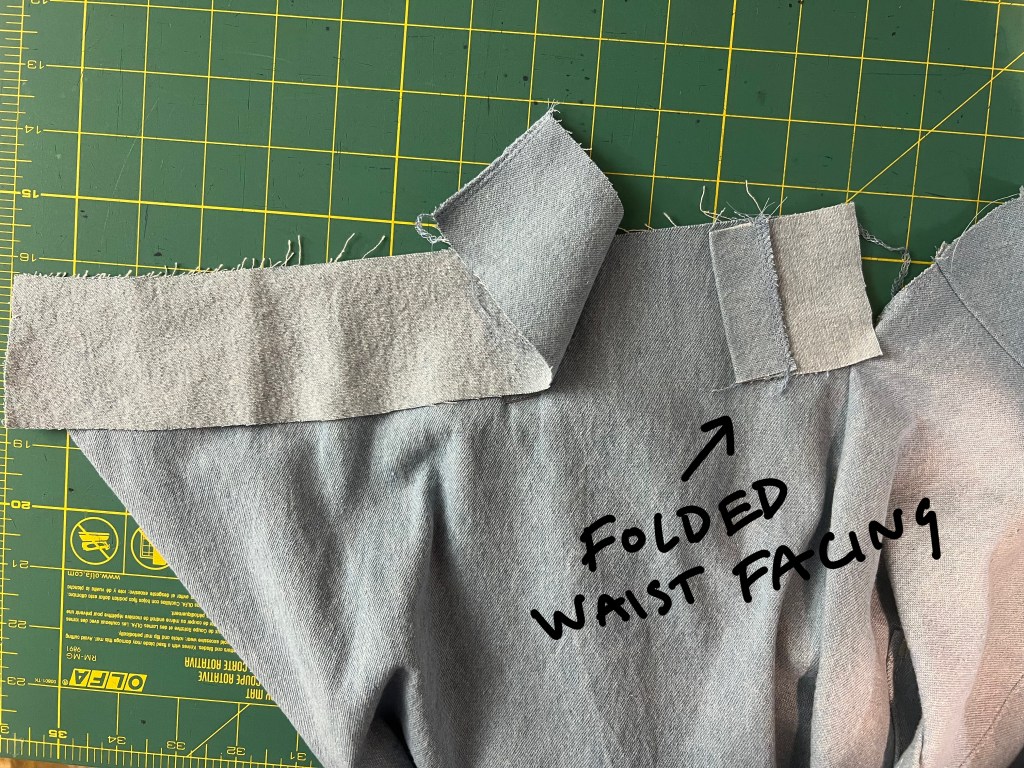
- As pictured above, fold the smaller waist facing and place it right sides together with the left front. Align the side seam of the left front with the non-folded edge of the small waist facing.
- I ignored the notches on the little waist facing piece — supposedly these indicate where to fold the facing but I found that these markings did not make sense and the fold they created was not the right size.
- Place the left front facing right sides together with the left front pant leg as pictured above. The short edge of the left front facing is aligned with the short edge of the folded waist facing.
- Make the tie tape pieces and top stitch them.
Side Slits
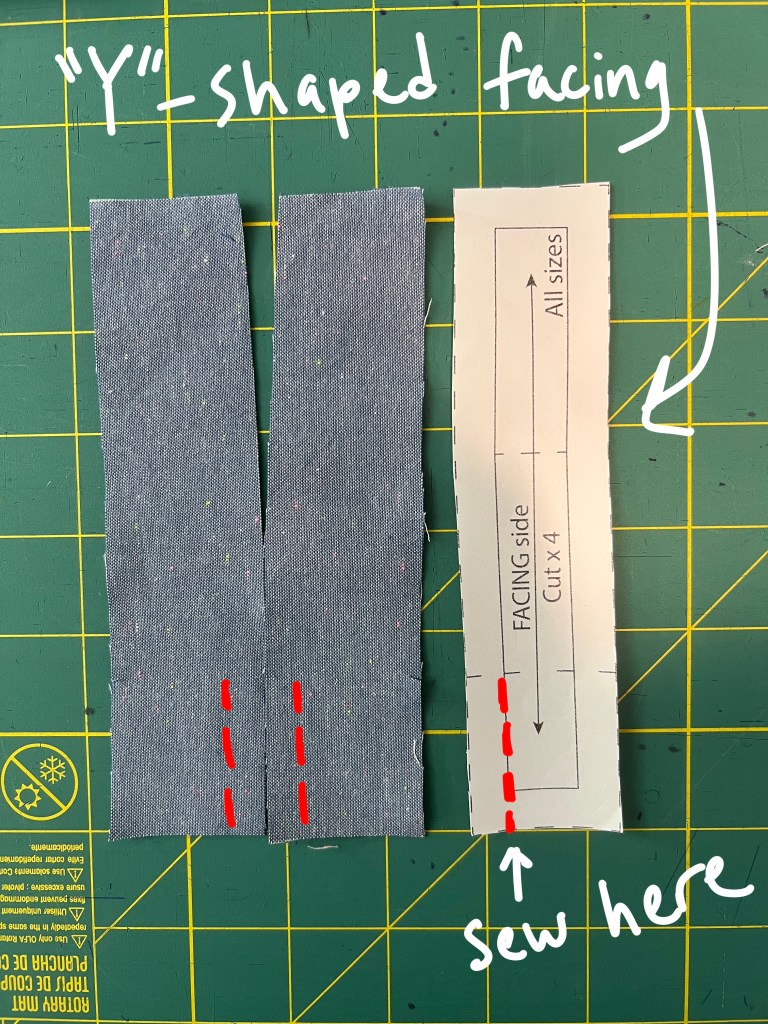
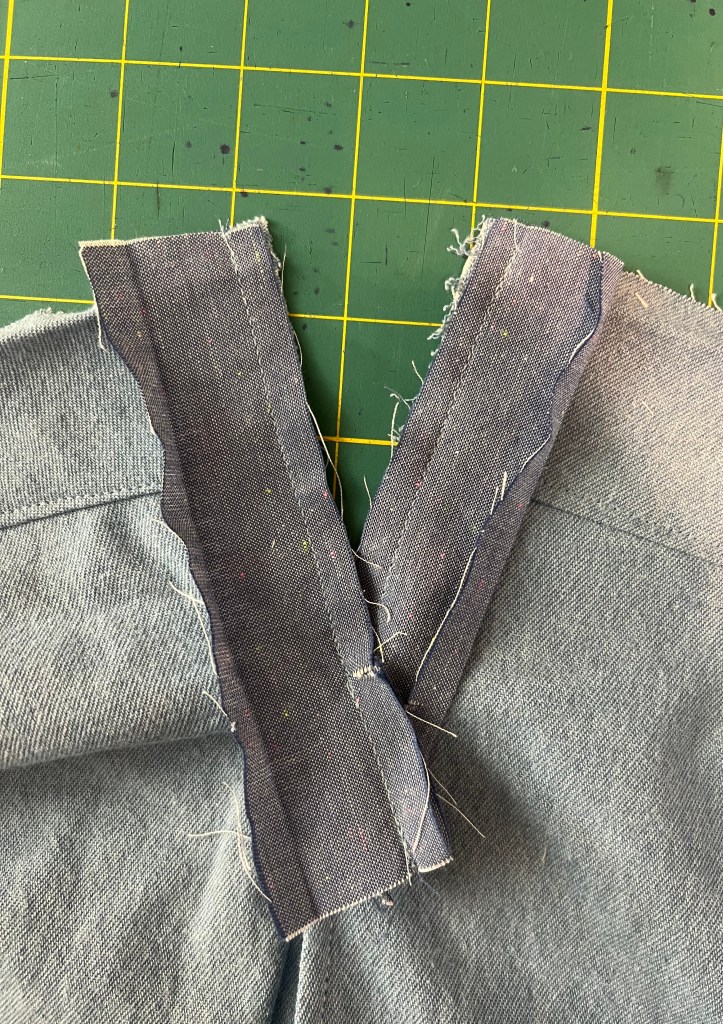
- There are 4 side slit facings and they are DIRECTIONAL. The instructions illustrate the side slit facing as a rectangle (step 6a), but this is misleading. There is a correct orientation that you need to follow for best results. You join 2 facing pieces to make a “Y” shaped facing for each side of the trousers:
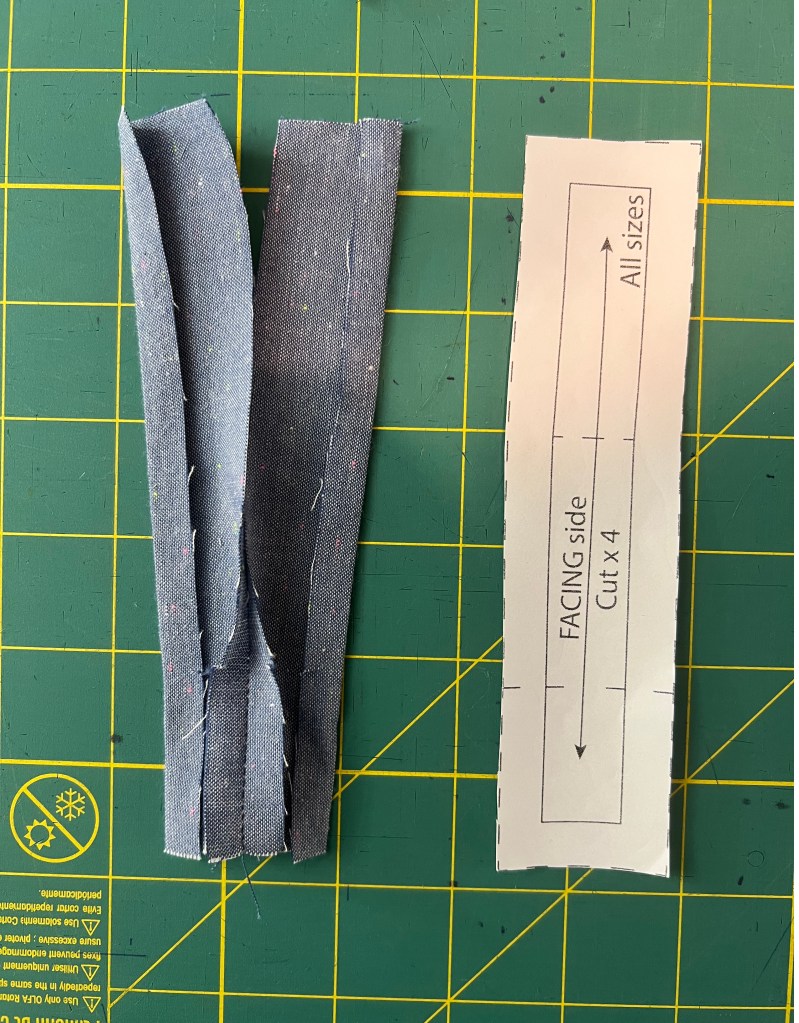
- After sewing the two facings together, press a 1cm seam allowance into the unsewn long edge of the side slit facing.
- Align the side slit facing with the pants. The unpressed edge of the side slit facing will be aligned with the side seam of the pants. Make sure the waist facing that you previously attached is pressed up and away from the pants, and the pre-pressed edge of the waist facing is unfolded. I had to trim a little bit off of my side slit facing, the legs were about 1cm too long.

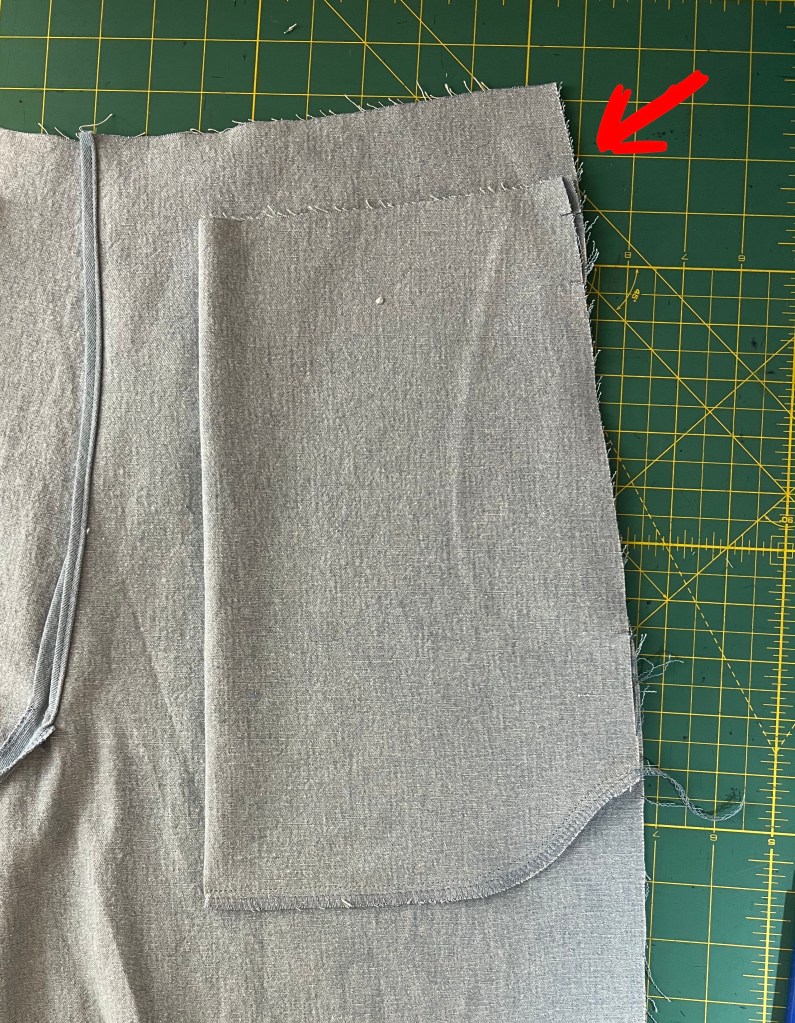
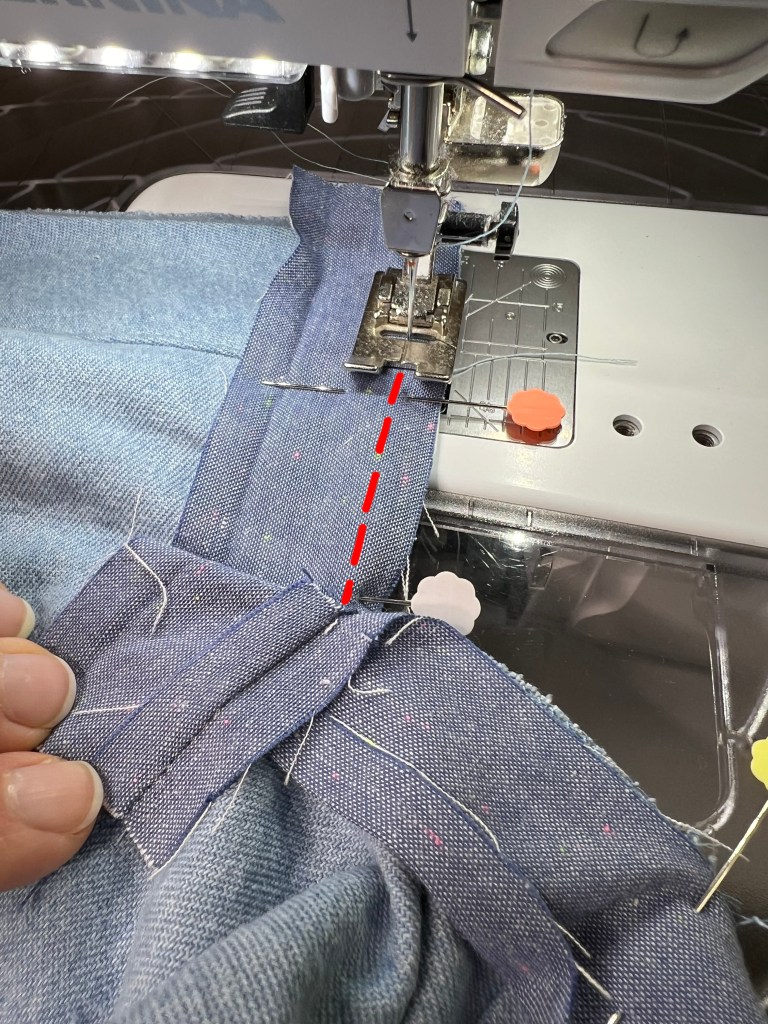
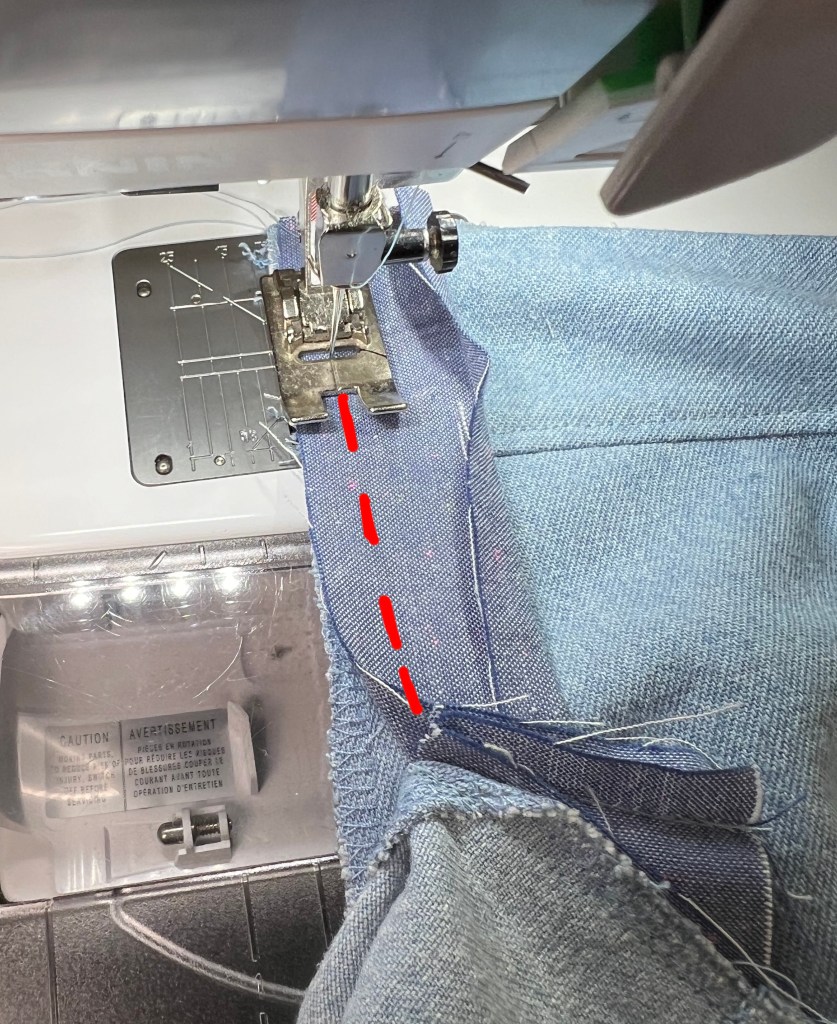
- Sewing the side facing takes some precision. I sewed the side slit facing to the front of the pants first (below). Sew from the top of the slit down to meet the stitches that you previously sewed into the side slit facing and without catching the side seam allowance from the back pants (red line below):
- Repeat for the other side of the facing, making sure not to catch the seam allowance from the front of the pants this time:
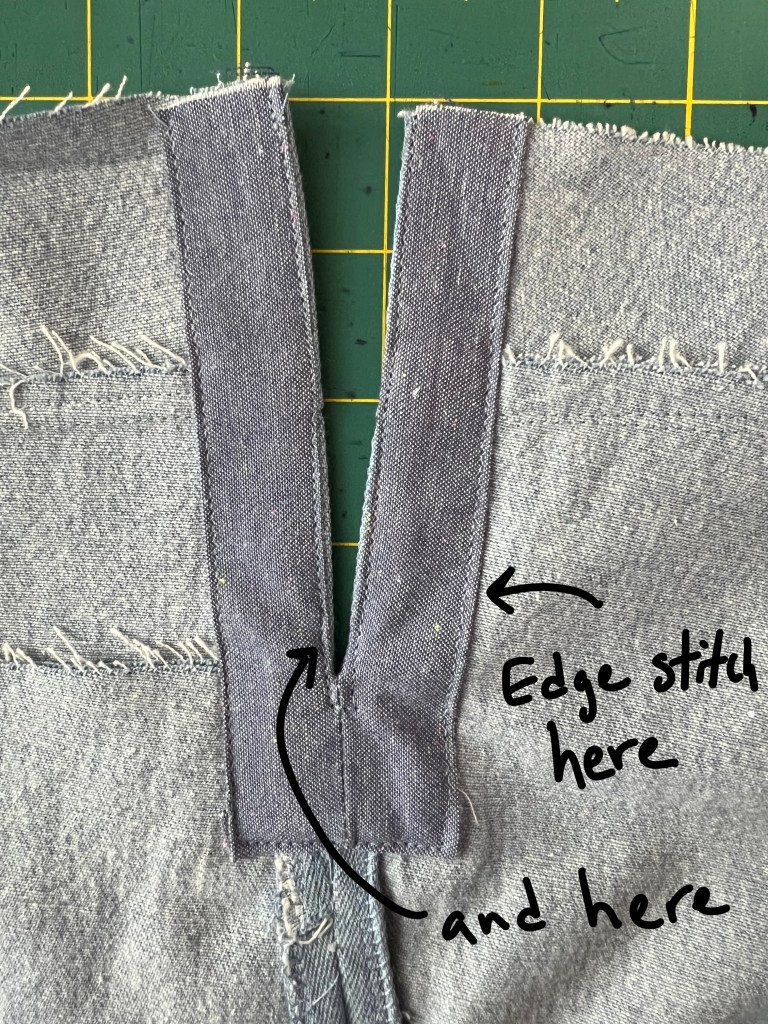
- Turn the facing to the wrong side and press well. Edgestitch in place. I also added edge stitching to the inner edge of the facing as well as the outer edge. Instructions only tell you to do the outer edge but the photographs of finished garments show inner edge is also edge stitched.
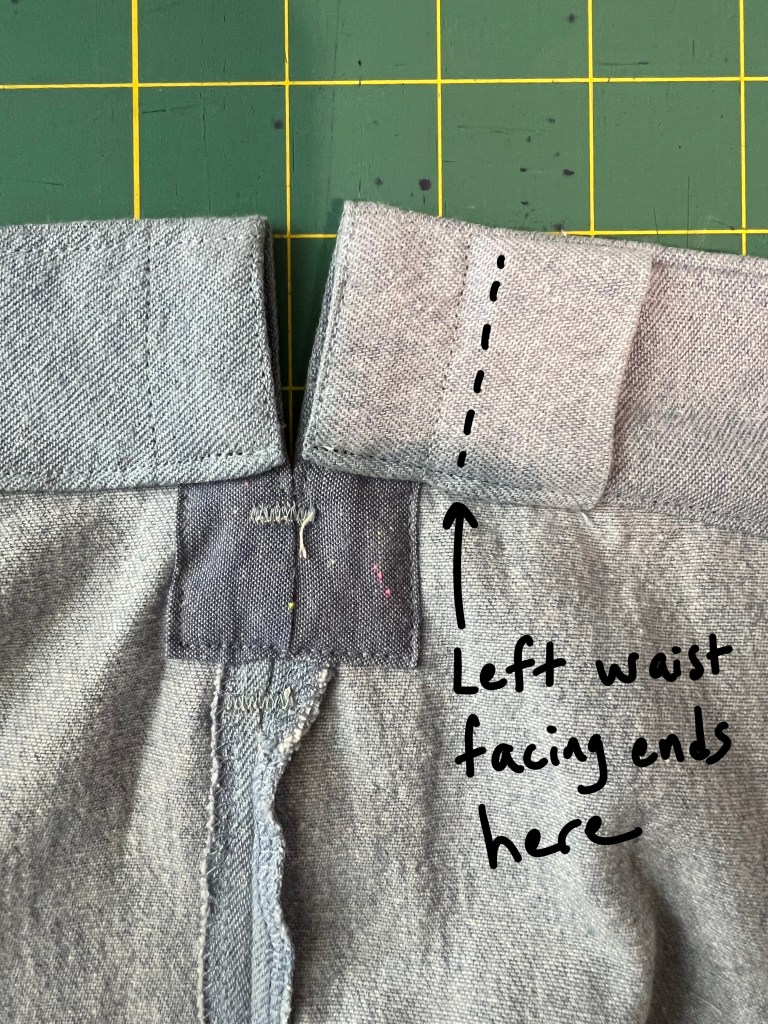
- On the left side of the garment, as you are edge stitching the side slit facing, be sure NOT to catch the left waist facing, only the smaller waist facing channel should be stitched through.
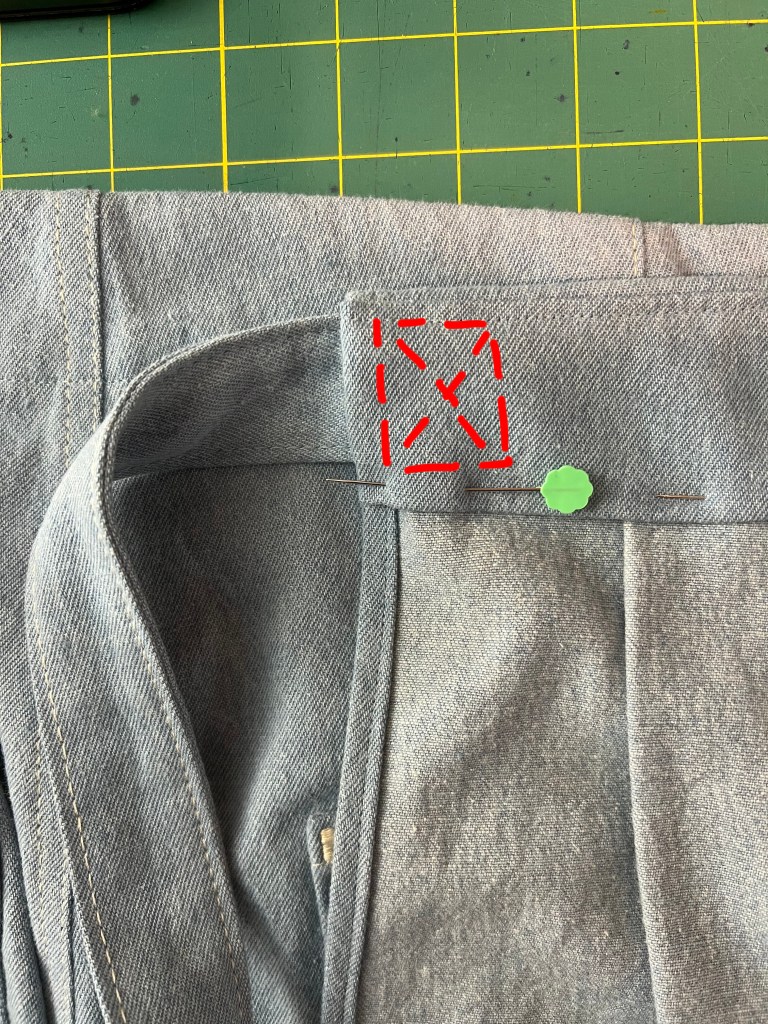
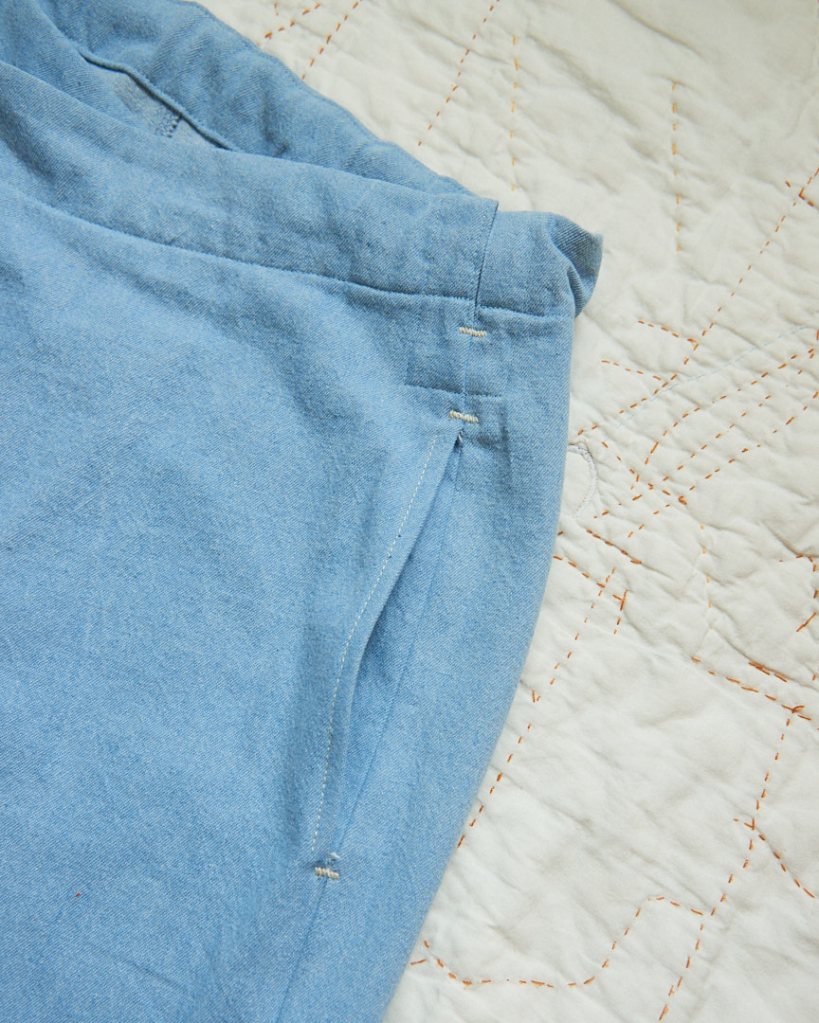
- Here is a photo from a few steps later, after I’ve closed the waist facing, but the edge stitching for the side slit facing only goes through the little side facing channel and NOT the longer left waist facing. If your stitching goes through both facings here, you will be closing this little channel and you won’t be able to get your waist tie through it.
Waistline facings
- Sew the waist ties as directed.
Left side waist facings:
- Fold the waist facing right sides together with the front of pants and sandwich the shorter waist tie in between:

- Clip the corner, then turn right side out. Pin the facing closed.

- Sew the waist facing to the pants along the bottom edge of the facing.
Right side waist facings
- The instructions direct you to do the same procedure to enclose the right side waist tie. However, if you follow those instructions, you will create a weird jog in the front of the pants, because the entire length of the front right side has already been finished. I ignored the instructions here and inserted the tie into the channel and top stitched to secure.

- Sew the waist facing to the pants along the bottom edge of the facing.
- Sew the back waist facing closed along the bottom edge of the facing to create the channel that will carry the waist ties.
Finishing touches
- The rest of the instructions are relatively straightforward from this point on. Add bartacks to the side slits, add the belt loop (if using), insert the tie through the back of the pants, and hem.
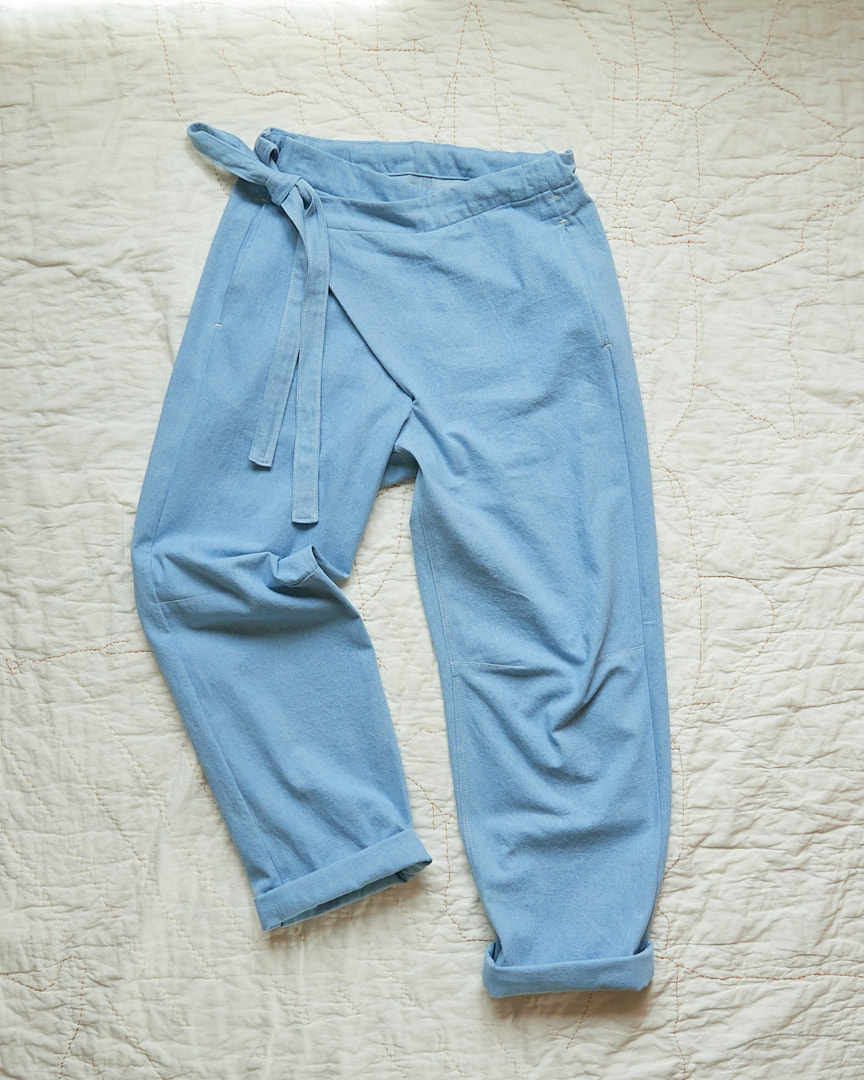
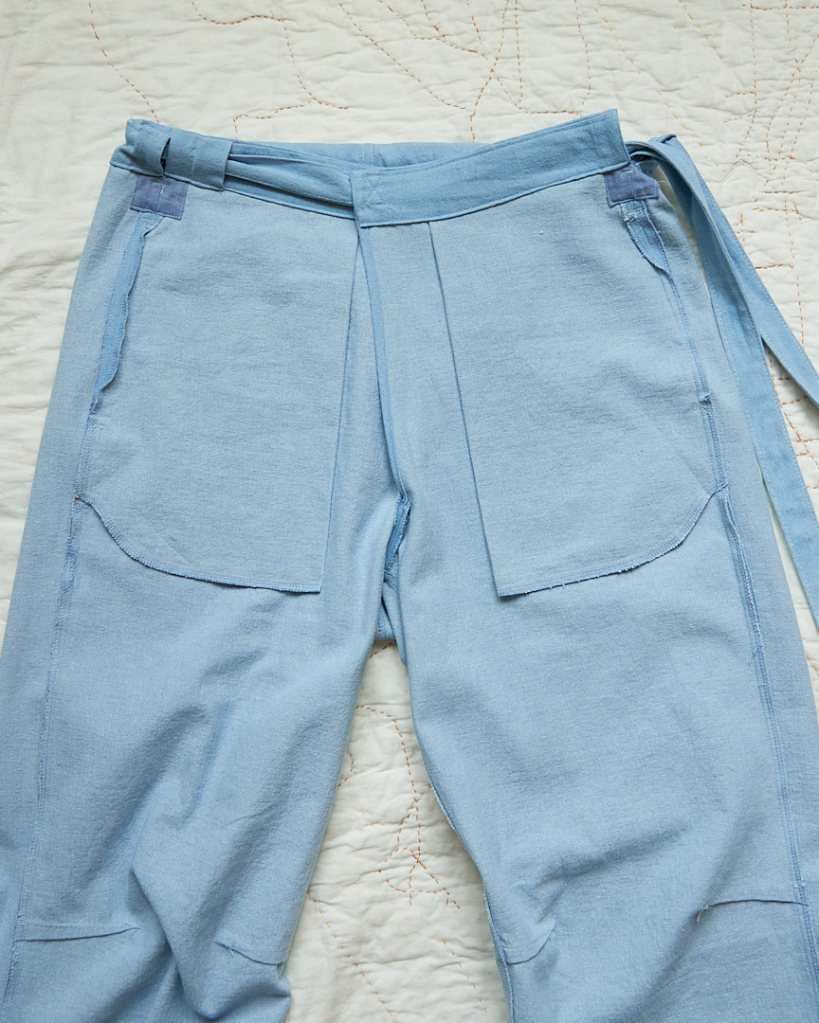
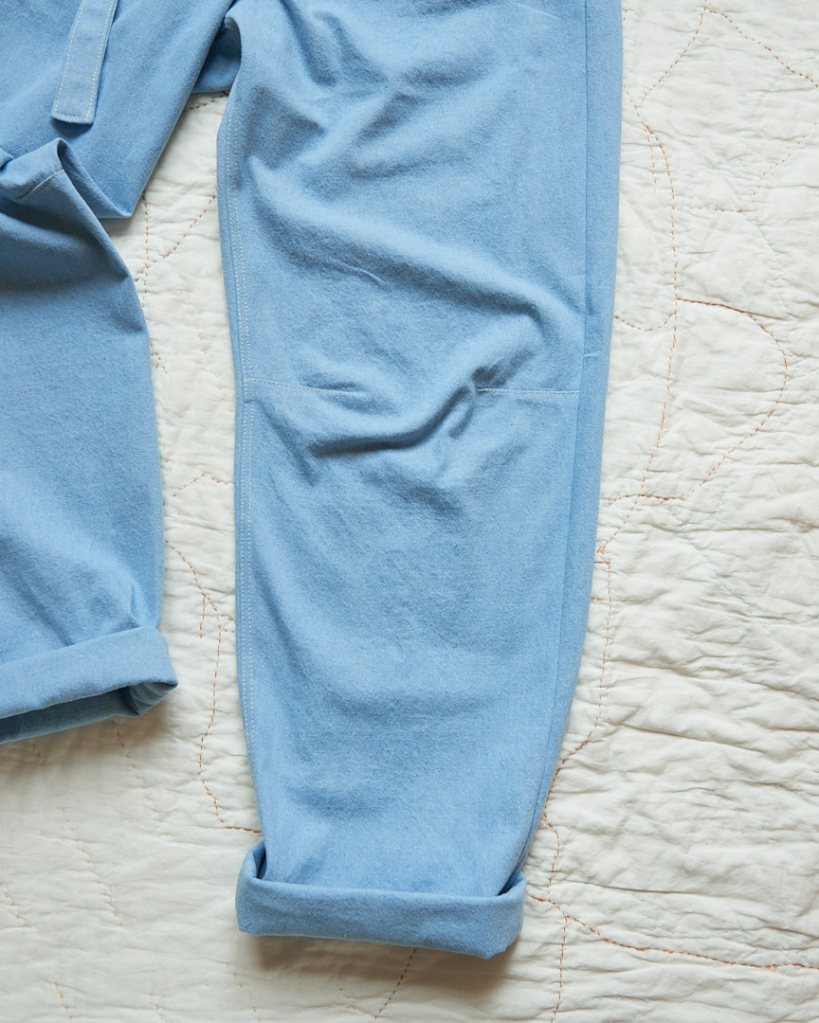
Final garment
Sometimes it’s helpful to see the final garment, inside and out. So here are a few detail shots of my construction.


Leave a comment